Adding Containers to Docker-console

In one of our previous articles, we showed you how to start a project based on docker-drupal application. Now we would like to go a step further and show you how to add new elements to our site based on the example of mailcatcher. As we mentioned earlier, thanks to docker we can get a set of blocks, which – when properly arranged – give us a nicely working project.
Starting point
All commands and examples in this article will be based on a project that you can easily run at home by following the instructions in the article at https://www.droptica.com/blog/start-your-adventure-docker-console-example-drupal-7-project/
Docker image
Now that we have a working project with docker-console, the next step is to find the docker image we want to add to it. You can find images at https://hub.docker.com/. It is best to use images that are marked as official or – if these are nowhere to find – the most popular ones. We also recommend visiting our repository at https://hub.docker.com/u/droptica/. In this example, we will be using our own image, which can be found at https://hub.docker.com/r/droptica/mailcatcher/.
Mailcatcher
Let us start with explaining what exactly is mailcatcher and why do we need it in the project. In simplest words, mailcatcher allows us to run an SMTP server, thanks to which we can intercept e-mail messages sent by our website. In addition, it also provides a GUI, thanks to which we will be able to read them and see how they look in a simple and convenient way. Mailcatcher is especially handy for a Drupal agency like us, where we often have to test emails sent by developed websites. If you would like to learn more about how mailcatcher works, I’d recommend reading more at https://mailcatcher.me/.
Adding the image to a project
In order to add an image to a project, you need to edit the docker-compose.yml file, which contains the entire structure of our project. After opening the file, you will see that as of now, the project is made up of three interconnected containers (web, MySQL and PHPMyAdmin). Adding mailcatcher is not particularly demanding because we only have to declare the name of the new container (mailcatcher in this case), and specify the name of the image that we are going to use in order to build this container (droptica/mailcatcher in our case) in the “image” variable. Then we link the newly created image to the web container, from which we will want to intercept e-mails (it is recommended to read about such requirements in the image description, in this case, that would be our base image at https://hub.docker.com/r/schickling/mailcatcher/). After doing that, the file should look similar to that presented below.
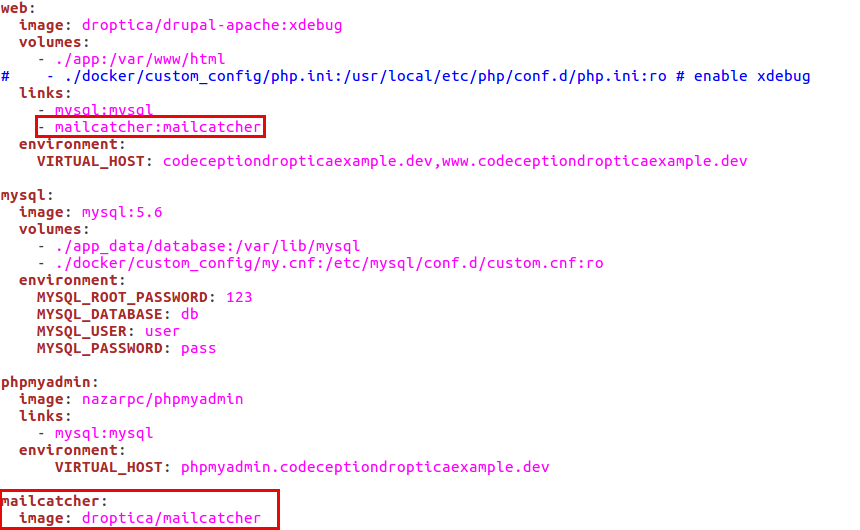
If you want to add another container here, I also recommend that you look at https://docs.docker.com/compose/compose-file/compose-file-v1/, where you will find a description of other commands that can be used in the docker-compose.yml file.
Starting up a new container
After adding an image to a file and saving changes, the mailcatcher image is not started yet. To do this, we need to execute a command in the project directory.
dcon up
We have already mentioned this command – it is used to start up our containers. In this case, we should build a new mailcatcher container and additionally rebuild the web container because we have made a change in it and now it is supposed to link to the mailcatcher container. In case, however, if the web container does not rebuild, we can force it by stopping all the containers in the project using the following command:
dcon stop
Then removing them by executing:
dcon rm
At this point, we can restart the containers with new settings by executing the following command:
dcon up
Now, when the container is running, we can check if it is actually working. Here, I would like to remind you that you can get to the container using its IP address, which you can check using the “docker inspect” command. In our case it is going to be:
docker inspect --format "{{ .NetworkSettings.IPAddress }}" dockerconsoleprojectexample_mailcatcher_1
By entering the IP address of the mailcatcher container in a browser (in my case it is http://172.17.0.9/) you should see a GUI allowing you to read e-mails, similar to the one in the screenshot below.

Example container dashboard
Now that we already have a mailcatcher container up and running, we still have one thing to do. We need to add SMTP modules and mailsystem to our project, which will enable us to send e-mails.
We can do this the traditional way by downloading them from a website https://www.drupal.org/project/smtp and https://www.drupal.org/project/mailsystem and then adding them to a catalogue, or by executing the following command:
dcon drush en mailsystem -y

dcon drush en smtp -y
After starting the modules, we still have to set up the mailsystem module to use SMTP as the default mailing system.
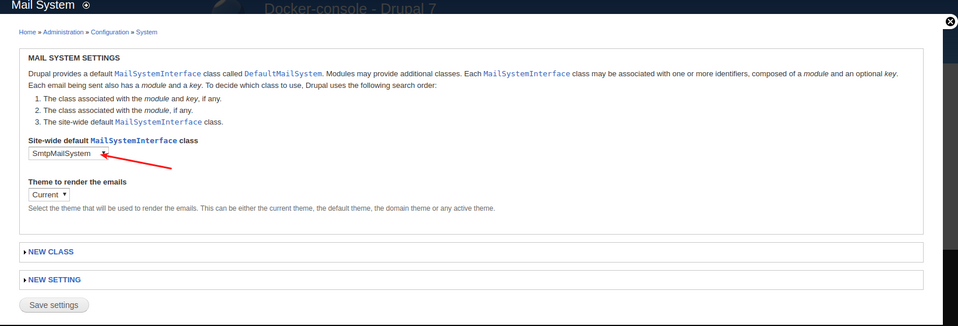
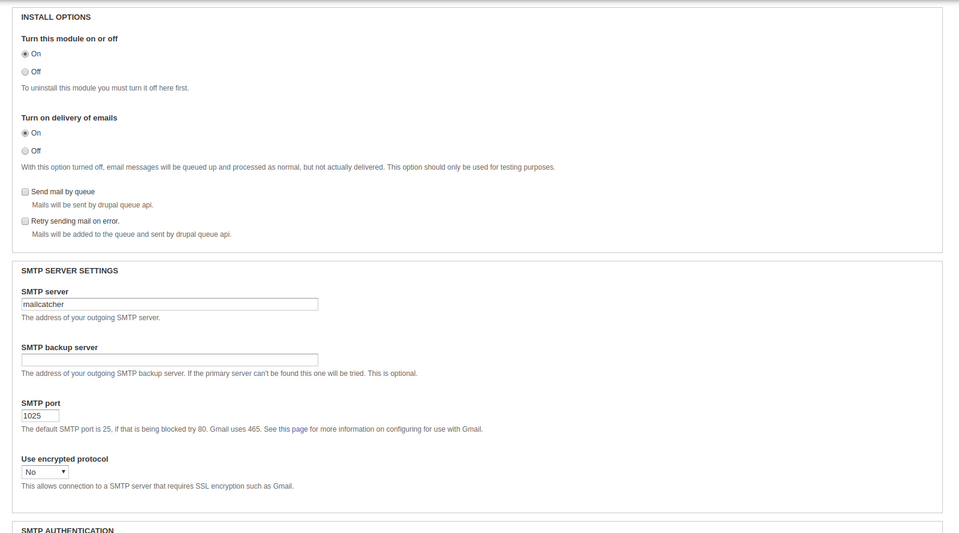
We also have to configure the SMTP module to use our mailcatcher container. In order to do so, go to /admin/config/system/smtp and set details as presented in the screenshots below:
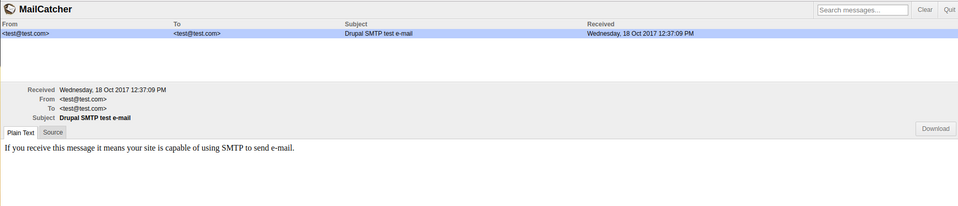
If everything is fine, the mailcatcher container should now contain an example e-mail address, like on the screenshot below.
At this point we could finish and enjoy having a working mailcatcher, additionally checking if it actually intercepts other messages and not just the test one (e. g. user registration or password reminder). However, I would like to talk about another thing here.
Starting SMTP during building the project
Sometimes there may be a situation where we want to be 100% sure that no one will turn off our SMTP module or that we need it only for testing and not in production. In such cases, you can include an instruction to start that module in the project building instructions.
You can check the steps involved in the process of building the project in the dc_overrides.py, which you can find in the docker_console folder. By default, there is no command defined for starting a module, which is why we should add it (without forgetting to import the corresponding classes). The example below shows what such a class should look like (the commands are written in Python; therefore, it is necessary to keep the indentation layout). Then, we need to add the newly added command to the “build-in-docker” instruction after importing the database (adding the function earlier would be pointless, as wiping and importing the database would get rid of all our changes).
# # import classes to override
from docker_console.web.engines.drupal7.builder import Builder

class BuilderLocal:
    def enable_mailcatcher(self):
        self.drush.en("mailsystem")
        self.drush.en("smtp")
        self.drush.run("vset -y 'smtp_host' 'mailcatcher'")
        self.drush.run("vset -y 'smtp_on' 1")
        self.drush.run("vset -y 'smtp_protocol' 'standard'")
        self.drush.run("vset -y 'smtp_port' 1025")
        self.drush.run("vdel -y 'smtp_username'")
        self.drush.run("vdel -y 'smtp_password'")

Builder.__bases__ += (BuilderLocal,)

commands_overrides = {

    'build-in-docker': [
        'drupal_settings.copy_settings("drupal7")',
        'archive.unpack_files(True)',

        'database.drop_db',
        'database.create_db',
        'database.import_db',
        'enable_mailcatcher',
        'drush.updb',

        'drush.uli'
    ]
}
Now, after running dcon build -y you will have all the necessary modules and the SMTP module configured. All that's left is to configure the mailsystem module. We can do it manually or, as in the case of the SMTP module, write the appropriate method in the file dc_overrides.py, which should look like the one below.
# # import classes to override
from docker_console.web.engines.drupal7.builder import Builder

class BuilderLocal:
    def enable_mailcatcher(self):
        self.drush.en("mailsystem")
        self.drush.en("smtp")
        self.drush.run("vset -y 'smtp_host' 'mailcatcher'")
        self.drush.run("vset -y 'smtp_on' 1")
        self.drush.run("vset -y 'smtp_protocol' 'standard'")
        self.drush.run("vset -y 'smtp_port' 1025")
        self.drush.run("vdel -y 'smtp_username'")
        self.drush.run("vdel -y 'smtp_password'")

    def enable_mailsystem(self):
        self.drush.en("mailsystem")
        php = """
            variable_set("mail_system", ["default-system" => "SmtpMailSystem"]);
        """
        self.drush.run("php-eval '%s'" % (php,))

Builder.__bases__ += (BuilderLocal,)

commands_overrides = {

    'build-in-docker': [
        'drupal_settings.copy_settings("drupal7")',
        'archive.unpack_files(True)',

        'database.drop_db',
        'database.create_db',
        'database.import_db',
        'enable_mailcatcher',
        'enable_mailsystem',
        'drush.updb',

        'drush.uli'
    ]
}
Now everything will be configured automatically when building a project. Now we can be sure that e-mails will not be sent from our local environment.
Project files
As a standard for this series of articles, if you did not manage to remake the project using the instructions from the article, you can do it by downloading the project files. You can find them in the mailcatcher branch of our repository.
Project repository:
https://github.com/DropticaExamples/docker-console-project-example
Database dump:
https://www.dropbox.com/s/r0o3u9gjp3dccd4/database.sql.tar.gz?dl=0
Project files:
https://www.dropbox.com/s/hl506wciwj60fds/files.tar.gz?dl=0
Summary
I am fully aware that this article does not exhaust the topic of adding new containers to docker console projects, but such an article could easily turn into a book, and even that would not be enough to cover everything. Therefore, I recommend taking a look at the links in the article and do not forget to share your experiences with docker. However, if I were to summarise the process of adding a new image to a project in a few short steps, these would be:
- finding or creating an image that you want to add;
- learning about the requirements for running a given image;
- adding the image to docker-compose.yml;
- adding configuration in Drupal (if the image requires it);
- rebuilding the containers (dcon up) or the entire project (dcon build – not always necessary);
- testing the operation of a new project element.
If you liked the projects using docker-console, you should definitely follow our blog, as we are going to publish more articles on this subject in the future.