
How to start your Vue.js adventure?

Front-end technologies are a field of the software development industry which constantly experiences almost exponential growth. More and more often, when starting new projects, developers decide to give up pure JavaScript and jQuery and replace them with modern frameworks for building application client layer. Then, they face a dilemma – which one to use? Usually, there are three that are taken into account: Vue, React and Angular. In this article, we will present the basics of the first one of them in as simple and friendly a way as possible.
What is Vue.js?
Vue.js, just like React.js and Angular, belongs to the family of the most popular JavaScript frameworks used for building UI. It enables developers to create both simple components, as well as advanced and scalable Single Page Applications using additional tools and libraries.
Vue instance and templates
At the very first stage of our deliberations, we have to get used to the way of linking the template with the JavaScript logic layer. For this purpose, we will discuss the creation of a Vue() instance and its basic properties. First, however, in order to be able to use it in our document, we need to include the code of a library available, for example, from a CDN.
HTML
<body>
  <div id="app">
    <p>{{ message }}</p>
    <p>{{ capitalize() }}</p>
    <p>{{ reversedMessage }}</p>
  </div>
</body>
JavaScript
const app = new Vue({
  el: '#app',
  data: {
    message: 'Hello world',
  },
  methods: {
    capitalize () {
      return this.message.toUpperCase()
    }
  },
  computed: {
    reversedMessage () {
      return this.message.split('').reverse().join('')
    }
  }
})
The main action that we have to do at the very beginning is to link the Vue object with a specific DOM element in our document. The Vue instance needs to know the scope in which it should work and this needs to be clearly defined. We do this by providing the name of the object el property selector, which we pass on as an argument of the Vue() constructor. Thanks to this, each child of the defined element will be observed and processed as a virtual DOM tree.
The data property contains fields that we are going to use to store data, methods keep the definitions of methods available within the instance range. Methods in computed are values calculated dynamically. We define them as methods, but when they are used we use them as a regular field (Vue calculates them automatically). This is extremely useful, for example in situations where you want to modify any value, but using a standard method is not the best solution (for example, because of a large number of dependencies).
Another important issue is referring to one of the above properties, which is done using this reference. It is possible due to the fact that Vue connects all properties with the main instance of the object, which provides direct access to them.
It is also worth noting the use of fields and methods in the template. Everything that is supposed to be displayed in the document is placed in double braces {{ }}. The only thing to bear in mind is that such syntax can be used only in nested #app elements.
Directives
Directives are special attributes used in templates. They are preceded by the prefix v-, for example: v-if, v-else, v-for, v-model, v-bind. It is worth remembering that many of them have aliases that can be used interchangeably.
v-if
Enables conditional rendering of the DOM element to which the directive is assigned.
HTML
<div id="app">
  <p v-if="isVisible">
    Some paragraph
  </p>
  <button @click="toggle">
    Toggle me!
  </button>
</div>
Javascript
const app = new Vue({
  el: '#app',
  data: {
    isVisible: true,
  },
  methods: {
    toggle () {
      this.isVisible = !this.isVisible
    }
  },
})
v-on
Enables binding event listeners to selected DOM elements.
Alias
v-on:click=”someMethod” -> @click=”someMethod”
HTML
<div id="app">
  <p v-if="isVisible">Some paragraph</p>
  <button @click="toggle">Toggle me!</button>
</div>
HTML version 2
<div id="app">
  <p v-if="isVisible">Some paragraph</p>
  <button v-on:click="isVisible = !isVisible">
    Toggle me!
  </button>
</div>
JavaScript
const app = new Vue({
  el: '#app',
  data: {
    isVisible: true,
  },
  methods: {
    toggle () {
      this.isVisible = !this.isVisible
    }
  },
})
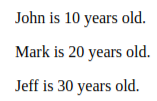
v-for
Enables executing a loop on the related DOM element.
HTML
<div id="app">
  <p v-for="person in people">
    {{ person.name }} is {{ person.age }} years old.
  </p>
</div>
JavaScript
const app = new Vue({
  el: '#app',
  data: {
    people: [
      { name: 'John', age: 10 },
      { name: 'Mark', age: 20 },
      { name: 'Jeff', age: 30 },
    ]
  },
})
The result
v-bind
Enables binding to DOM element attributes.
Alias
v-bind:title=”someTitle” -> :title=”someTitle”
HTML version 1
<div id="app">
  <p v-bind:class="className">Some paragraph</p>
  <button @click="toggle">Toggle color</button>
</div>
HTML version 2
<div id="app">
  <p :class="className">Some paragraph</p>
  <button @click="toggle">Toggle color</button>
</div>
Javascript
const app = new Vue({
  el: '#app',
  data: {
    className: 'red',
  },
  methods: {
    toggle () {
      this.className = this.className == 'red'
        ? 'blue'
        : 'red'
    }
  }
})
v-model
Enables binding DOM elements such as <input> to data object fields.
HTML
<div id="app">
  <input type="text" v-model="inputValue" name="exampleInput">
  <p>{{ inputValue }}</p>
</div>
JavaScript
const app = new Vue({
  el: '#app',
  data: {
    inputValue: ''
  }
})
Components
Components are Vue instances, enabling you to repeatedly re-use code fragments in a universal way. This enables you to avoid repetition, thus making you comply with the DRY (Don't Repeat Yourself) principle. Thanks to this, the application looks clean and the code is legible, and should the need arise, you do not have to fix bugs in many places.
HTML
<div id="components-demo">
  <button-counter></button-counter>
  <button-counter></button-counter>
  <button-counter></button-counter>
</div>
JavaScript
Vue.component('button-counter', {
  data () {
    return {
      count: 0
    }
  },
  template: `
    <button v-on:click="count++">
      You clicked me {{ count }} times.
    </button>
  `
})
The result

The component is defined using the Vue.component. The first argument of the method is the name of the DOM element to be used in templates. The second parameter is an object, which in this case has two properties. The most important of these is the template, which will be replaced in the real DOM tree each time the component is used. The second property of the object is the data method (method, not the object!) that returns an object with data that will be available for a single component.
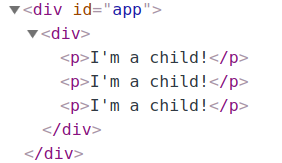
Components can be nested inside each other, which enables you to build more advanced and complex template structures. The example below shows two simple examples: parent and child. Special <slot></slot> tags were used there, which serve as a placeholder. Whatever was placed in the parent element is rendered in their place.
HTML
<div id="app">
  <parent>
    <child></child>
    <child></child>
    <child></child>
  </parent>
</div>
JavaScript
Vue.component('parent', {
  template: '<div><slot></slot></div>',
})
Vue.component('child', {
  template: `<p>I'm a child!</p>`
})
const app = new Vue({
  el: '#app',
})
The result
Events
We were dealing with event handling when we talked about the v-on directive. We are going to use it to add an event listener, which will listen to the occurrence of a defined event, and after triggering it, it will perform a specific action (for example, it will invoke a method). Let's go a step further and think about what communication between components looks like in the context of events. Here, you can imagine a simple situation in which we have a DOM tree consisting of a parent element a and a nested child. The question is: how to inform the parent that an event has been triggered from the level of a nested element? Let's analyse the example below.
HTML
<div id="app">
  <div>
    <example @execute="onExecute"></example>
  </div>
</div>
JavaScript
Vue.component('example', {
  template: `
    <button @click="execute">
      Execute!
    </button>
  `,
  methods: {
    execute () {
      this.$emit('execute')
    }
  }
})
const app = new Vue({
  el: '#app',
  methods: {
    onExecute () {
      alert('Doing some fancy stuff...')
    }
  }
})
First of all, let’s note the example component, the template of which contains a standard button. The execute method, which performs a key action, is invoked when it’s clicked. For the component object, the $emit method is invoked, which emits an event that can then be intercepted by the higher layer component. The first argument of the method is the @execute parent event name. In the second one (which is absent in this example) you can add the data that you want to pass to the method invoked by the parent event.
However, the above method is not entirely effective when you are dealing with many nested components, because, in order to inform the first of them, you have to use this procedure with each child. It is easy to imagine the negative impact of this approach on application maintenance. One of the solutions to this problem is the creation of a new Vue instance, linking it to the global window object, and then (based on the mechanism of linking all object properties by Vue) using methods such as $emit (to emit the event) and $on (to listen for the event and perform the action in response). In this way, no matter how nested the components, the events can be handled throughout the entire application.
HTML
<div id="app">
  <div>
    <example></example>
  </div>
</div>
JavaScript
window.Event = new Vue()
Vue.component('example', {
  template: '<button @click="execute">Execute!</button>',
  methods: {
    execute () {
      Event.$emit('execute')
    }
  }
})
const app = new Vue({
  el: '#app',
  created () {
    Event.$on('execute', () => alert('Doing some fancy stuff...'))
  }
})
Lifecycle
Vue, just like React or Angular has a component lifecycle and events to which you can react. There are several methods that are worth noting, as they are extremely useful in many common situations. One of the examples can be loading data from an external API, using AJAX requests as soon as a component is created by Vue. The most frequently used object events are: created, mounted, updated.
Use in mid-sized and large applications
Having presented the basic mechanisms, we can talk about issues related to the real methodologies of building applications in Vue. For this purpose we are going to build a simple application with the help of vue-cli – a console application based on node.js, thanks to which we will be able to manage our application from the terminal. To install vue-cli you need to have node.js and npm/yarn, and then run one of the commands:
Use the following commands to create an application:
npm install -g @vue/cli
or
yarn global add @vue/cli
To create the application use:
vue create [nazwa-projektu]
This command will create a project with the following tree of directories and files:
├── babel.config.js
├── package.json
├── package-lock.json
├── public
│   ├── favicon.ico
│   └── index.html
├── README.md
└── src
    ├── App.vue
    ├── assets
    │   └── logo.png
    ├── components
    │   └── HelloWorld.vue
    └── main.js
For the purpose of this article, we are going to focus only on four files, which will have a visible impact on our application (the rest of them are mostly configuration files, which we are not going to talk about here). They were slightly altered in order to enable presenting an appropriate approach. They are:
- public/index.html
- src/main.js
- src/App.vue
- src/components/HelloWorld.vue
public/index.html
By default, each web application starts with an index.* file – nothing was changed in this regard. The only thing we need to take note of is defining our core DOM element, which we are going to use to bind our main Vue instance.
<!DOCTYPE html>
<html lang="en">
  <head>
    <meta charset="utf-8">
    <meta http-equiv="X-UA-Compatible" content="IE=edge">
    <meta name="viewport" content="width=device-width,initial-scale=1.0">
    <link rel="icon" href="<%= BASE_URL %>favicon.ico">
    <title>my-awesome-project</title>
  </head>
  <body>
    <noscript>
      <strong>We're sorry but my-awesome-project doesn't work properly without JavaScript enabled. Please enable it to continue.</strong>
    </noscript>
    <div id="app"></div>
    <!-- built files will be auto injected -->
  </body>
</html>
src/main.js
A starting point in the context of JavaScript logic. There are three basic things happening here, which are worth looking at.
- A Vue instance is created.
- Rendering the highest-level component is moved to App.vue.
- The Vue instance is bound to the #app element in the index.html file.
import Vue from 'vue'
import App from './App.vue'

Vue.config.productionTip = false

new Vue({
  render: h => h(App)
}).$mount('#app')
src/App.vue
To understand how the code of this file works, we need to discuss the structure of Single File Components. According to this concept, as the name suggests, each component must be in a separate file and have *.vue extension. Let's take a look at the example below.
<template>
  <div id="app-container">
    <hello-world message="Welcome to Your Vue.js App"/>
  </div>
</template>

<script>
  import HelloWorld from './components/HelloWorld.vue'

  export default {
    components: {
      HelloWorld
    }
  }
</script>

<style>
  #app-container {
    text-align: center;
    color: #2c3e50;
    margin-top: 60px;
  }
</style>
We can distinguish three main elements of the file content.
template
Component template. Here, we put the code, which until now was in the template property.
script
Component logic. As you can see, we do not use Vue.component here (this is the definition of a global component). You should keep in mind that you cannot refer to it without importing it first. Additionally, the name of the imported component must be placed in the components field of the exported object in order for the framework to properly convert the template into real HTML syntax.
style
Component-related styles. Here you can use pure CSS or use one of the known pre-processors: Sass, Less or Stylus. When building an application, such code will be compiled into a browser-friendly CSS.
src/HelloWorld.vue
The second Single File Component in our application. Take a closer look at the way in which properties are passed on. App.vue contains its own message attribute, which is then added to the props table in the subcomponent. The scope attribute in the <style> tag is also worth taking a closer look at. It makes sure that the style will be applied to that component only. Referring to the example above, this means that paragraphs will be red only in the HelloWorld component.
<template>
  <div class="hello">
    <p>{{ message }}</p>
  </div>
</template>

<script>
  export default {
    props: ['message']
  }
</script>

<style scoped>
  p {
    color: red;
  }
</style>
The next stage of application development looks the same. You can create complex component structures in order to achieve the desired result in the form of a full and functional application. There is a wide range of libraries and add-ons dedicated to Vue. You can enrich your application with Routing (Vue-Router), Vuex (Redux equivalent), ready-made components from CSS frameworks (for example Bootstrap, Foundation), as well as libraries (Lodash, Axios) and many others. The possibilities are almost endless.
What's next?
In this article, we presented the very basics of creating simple Vue.js applications. We got to know the fundamental mechanisms implemented in the framework. We already know how a Vue instance works, what are directives and how to build reusable components. We also know how to approach application development using npm and vue-cli.
However, the knowledge presented here is really basic, which is why it is worth getting to know more advanced techniques (see "Recommended Sources”). It can bring a number of advantages: Good knowledge of one of the modern JavaScript frameworks speeds up the creation of a client layer, the code is better organised and less susceptible to errors, which results in attractive and complex front-end applications.
Recommended Sources
A trove of knowledge about Vue.js:
https://github.com/vuejs/awesome-vue
A free series of tutorials which perfectly complements this article:
https://laracasts.com/series/learn-vue-2-step-by-step
Paid course on Udemy:
https://www.udemy.com/vuejs-2-the-complete-guide