
Codeception - How to start automatic tests

If you read our previous posts, you already know very well how to start a project in the docker-console. If you haven’t done it yet, you should start with this article, because for the purpose of this article we assume that your project in the docker-console is already up and running, therefore all commands executed below will refer to it. In this article, we would like to introduce you to the world of automatic tests using Codeception, based on this kind of a project. Of course, not everyone has to automate all the tests on their projects, but if this will not require too much work, we bet that many people will look at a set of “smoke tests” favorably, to say the least.
In Droptica, we try to be the best Drupal agency on the market, and we strongly believe that automated tests help us in achieving that. They drastically reduce the amount of bugs. We maintain projects in whch not a single bug got to porduction for months. But enough about us. Let's see how how can use Codeception.
What is codeception?
Codeception is a framework used for creating tests, including unit tests, functional tests, and acceptance tests. Despite the fact that it is based on PHP, the user needs only basic knowledge for starting work with the framework, thanks to the set of custom commands offered by Codeception. Of course, the more you want to test, the more you should learn about PHP development and automatic test structure. In Codeception, tests are written in a BDD (Behaviour Driven Development) style – a set of short stories that tell us about the behavior of the system when something specific happens.
Installation
We already have a ready Codeception image, so you will not have to install anything. Just download the files for our project (of course, by “our project” here I mean the project created based on the article about the basics of docker-console). In order to do so, just execute the following command in the project’s folder:
docker-console init-tests --tpl drupal7
or for a project with Drupal 8
docker-console init-tests --tpl drupal8
Upon execution, it will create a “tests” folder with a testing environment installed and ready to use. The remaining configuration will be the same for Drupal 7 and 8 (not counting additional modules written for the concrete version).
General configuration
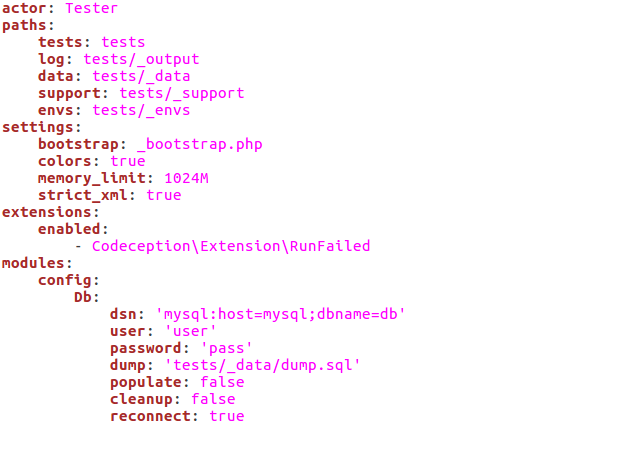
The general configuration data is stored in the codeception.yml file, which should look more or less like the example below. Using the file, we can configure project paths, increase memory limits, set a default configuration for a specific module and so on. At this point, you do not have to set anything here for the project to work smoothly.
Detailed configuration
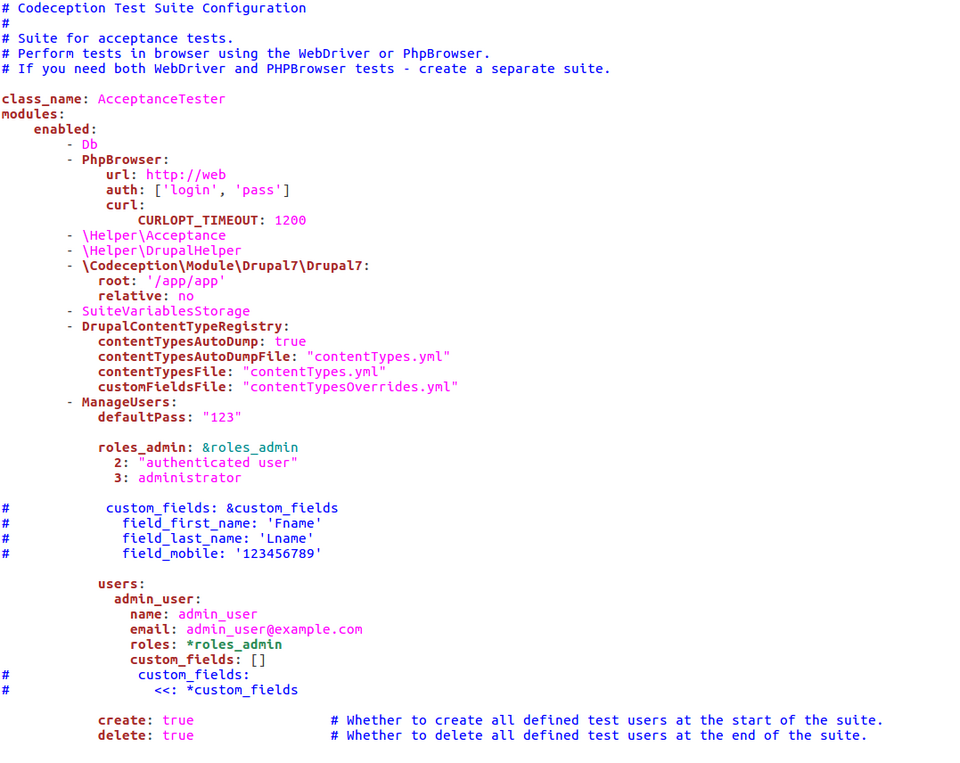
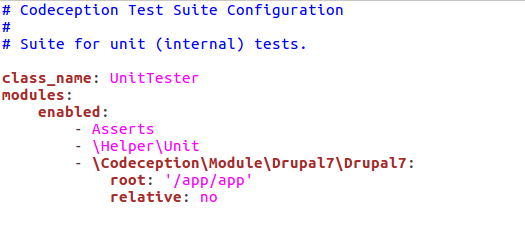
Additionally, apart from the main configuration file, each test suite has its own configuration file, such as acceptance.suite.yml. Here, we create a tester class, which specifies the exact modules we can use during a test and – should the need arise – allows us to override the settings from the general file. We don’t have to change anything at the moment here; however, I would like to point out the PhpBrowser settings. The URL (http://web ) set here does not have to be changed, because the name “web” refers to the name of our docker container, which holds our website. The “auth” variable refers to the username and password which we can use to secure our site using .htaccess. Since we don’t use such security measures in our project right now, you can delete this line from the config file. The discussion of the remaining modules is far more complex and extensive topic, which I will try to cover in the upcoming article.
A quick introduction to tests
As I already mentioned before, using Codeception you can write unit, functional and acceptance tests.
In our case, we divided the latter according to the driver used. The main reason for such division was the faster test execution time in the case of using PhpBrowser and the need to use WebDriver for tests where JavaScript functions were used on the website.
|
PhpBrowser |
WebDriver | |
|---|---|---|
| Browser engine | Guzzle + Symfony BrowserKit |
Chrome or Firefox |
| JavaScript | NO | YES |
| Visibility of elements on the website |
The text is visible if it is included in the source |
The text is visible only if it is visible for the user visiting the website |
| Reading HTTP response headers |
YES | NO |
| Testing speed | Moderate | Slow |
The table below shows the general differences between various test types. We also decided to add JS_capable tests, which are also included among acceptance tests; however, unlike the acceptance suite executed using PhpBrowser, JS_capable tests are launched using Webdriver in Chrome or Firefox web browser (as I mentioned before, this is our configuration and of course nothing stops you to add WebDriver to the acceptance suite).
| Unit | Functional | Acceptance | JS_capable | |
|---|---|---|---|---|
| Scope | PHP class | PHP Framework | Website opened in a web browser (visible HTML) |
Website as seen by the end user |
| JavaScript | NO | NO | NO | YES |
| Webserver required | NO | NO | YES | YES |
| Testing speed | HIGH | HIGH | MIDDLE | LOW |
| Configuration file | unit.suite.yml | functional.suite.yml | acceptance.suite.yml | js_capable.suite.yml |
Selectors
The last thing I would like to discuss before we move on to writing examples of tests are locators, which is the way Codeception finds the elements which we want to use during our tests. In Codeception, you can find the elements using:
- id, for example, ‘#test’, which corresponds to <div id=”test”>
- classes, for example, ‘.test’, which corresponds to <div class=”test”>
- names, for example ‘test’, which corresponds to <div name=”test”> or <input value=”test”> or simply the text visible on the website.
- CSS, for example 'input[value=test ]' which corresponds to <input value="test">
- XPath, for example //input[@type='submit'][contains(@value, 'test')]"], which corresponds to <input type="submit" value="foobar">
You can also use more complex locators, which are described in more detail here: http://codeception.com/docs/reference/Locator
Regardless of the way you are going to locate your element, you should always aim at doing so in the most explicit and unambiguous way.
Acceptance tests
If you have test cases, which you always have to click through before you deploy the website in order to see whether or not it works properly, what you really have on your hands are perfect candidates for automation and placing the tests in the Codeception acceptance test folder. In the case of our configuration, the acceptance folder contains all the tests, which can be conducted without using JavaScript, as in this case we are using PhpBrowser (this is not necessary, but certainly faster.) With these tests, we have many helpful and already defined functions, the list and descriptions of which you can find on the website: http://codeception.com/docs/modules/PhpBrowser
As an example, we have a test here, where we log in on an administrator’s account and see whether the text of one of the articles is visible on the home page.
<?php

class ExampleAcceptanceTestCest
{
  public function _before(AcceptanceTester $I) {
  }

  public function _after(AcceptanceTester $I) {
  }

  /**   TESTS     */

  /**
   * @param \AcceptanceTester $I
   *
   */
  public function exampleTest(AcceptanceTester $I) {
    $I->wantTo('Test - I can log in as admin and see article');
    $I->amOnPage('/');
    $I->fillField('#edit-name', 'admin');
    $I->fillField('#edit-pass', 'admin');
    $I->click('Log in');
    $I->amOnPage('/');
    $I->see('Droptica sięga korzeniami roku 2008, kiedy to jeden ze współzałożycieli stworzył swoją pierwszą firmę programistyczną openBIT');
    $I->amOnPage('/user/logout');
  }
 }
Js_capable tests
Additionally, for our needs, we added the js_capable suite, where we write acceptance tests requiring JavaScript. Generally, we should be able to copy the test from the acceptance folder, paste it into js_capable and it should work right away; however, we have to remember that in this case, the program sees every element exactly as if it was a user, therefore adding display:none in CSS will remove that element from sight, while in the case of PhpBrowser it will remain visible, as it is included in the HTML code. For comparison, you can read the list of functions available for WebDriver: http://codeception.com/docs/modules/WebDriver
Before I show you an example test, I would also like to discuss the configuration of such tests. In order to launch them, you don’t need to have WebDriver or even a web browser installed locally, because everything sits nicely in a docker container. Right after initializing the project with tests, the environment is ready to launch them in Chrome with the newest Webdriver. If, however, you'd like to see how your tests are doing in Firefox, you need to change it in two places: First, you have to replace “chrome” with “firefox” in the js_capable.suite.yml file.

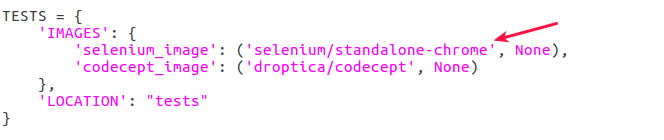
Then, you have to change the Selenium image for one that contains Firefox. You can do this by editing dc_settings.py, located in a docker console folder, where you should replace “standalone-chrome” with “standalone-firefox”.
You can learn more about that at:
https://hub.docker.com/r/selenium/standalone-chrome/
https://hub.docker.com/r/selenium/standalone-firefox/
Now it is time for an example which adds nodes like the article and basic page.
<?php

class JSCentreTestsCest
{

  public function _before(JSCapableTester $I) {
    }

  public function _after(JSCapableTester $I) {
  }

  /**   TESTS     */

  /**
   * @param \JSCapableTester $I
   *
   */
  public function addArticle(JSCapableTester $I) {
  	$I->wantTo('Test - I add article');
  	$I->amOnPage('/');
  	$I->fillField('#edit-name', 'admin');
  	$I->fillField('#edit-pass', 'admin');
  	$I->click('Log in');
  	$I->amOnPage('/node/add/article');
  	$I->fillField('#edit-title', 'Test article');
  	$I->fillField('#edit-body-und-0-value', 'Test text in body article');
  	$I->click('#edit-submit');
  	$I->see('Article Test article has been created.');
  	$I->see('Test text in body article');
  	$I->amOnPage('/user/logout');
  }

  /**
   * @param \JSCapableTester $I
   *
   */
 public function addPage(JSCapableTester $I) {
  	$I->wantTo('Test - I add basic page');
  	$I->amOnPage('/');
  	$I->fillField('#edit-name', 'admin');
  	$I->fillField('#edit-pass', 'admin');
  	$I->click('Log in');
  	$I->amOnPage('/node/add/page');
  	$I->fillField('#edit-title', 'Test basic page');
  	$I->fillField('#edit-body-und-0-value', 'Test text in body page');
  	$I->click('#edit-submit');
  	$I->see('Basic page Test basic page has been created.');
  	$I->see('Test text in body page');
  	$I->amOnPage('/user/logout');
  }

}
If you would like to learn more about acceptance tests, you should definitely visit:
http://codeception.com/docs/03-AcceptanceTests
Functional tests
Functional tests are written in a way that is very similar to the way we wrote our acceptance tests. The main difference is that they don’t have to be launched on a webserver, which makes them much faster. As an added benefit, they also offer additional commands, which allow for testing frameworks such as Symfony, Laravel5, Yii2, Yii, Zend Framework 2, Zend Framework 1.x and Phalcon. In reality, writing functional tests makes sense only if you are using one of those frameworks, that is unless you write the necessary functions on your own.
Below, I will show you what such a test may look like.
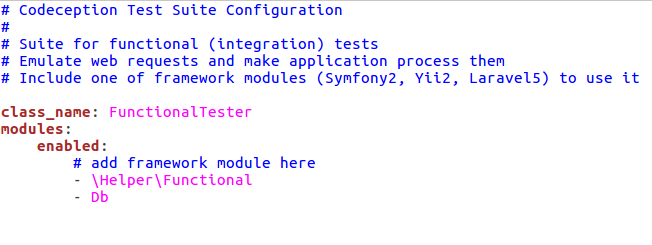
Before we start writing a test, we have to add the ability to use the Db module for functional tests in the functional.suite.yml file. After this change, the file should look as follows:
Now we are going to write a test that checks whether the database contains nodes (adding nodes could also be included in this test).
<?php

use Drupal\Pages\Page;
use Codeception\Util\Shared\Asserts;

class ExampleFunctionalTestCest
{

  use Asserts;

  public function _before(FunctionalTester$I) {
  }

  public function _after(FunctionalTester $I) {
  }

  /**   TESTS     */

  /**
   * @param \FunctionalTester $I
   */
  public function exampleTestOfText(FunctionalTester $I) {
    $I->wantTo('Test - I can see node in database');
    $I->haveInDatabase('node', array('type' => 'article', 'title' => 'WSZYSTKO, CO CHCIELIBYŚCIE WIEDZIEĆ O REKRUTACJI W DROPTICE'));
    $I->haveInDatabase('node', array('type' => 'page', 'title' => 'Test page'));
  }

 }
You can read more about functional tests here: http://codeception.com/docs/04-FunctionalTests
Unit tests
If you wrote PHPUnit unit tests in the past, you don’t have to learn anything from scratch and you can carry on using the same syntax as before.
In my example, it will be necessary for me to enable using Drupal commands by in order to make this test work properly. In order to do this, I will have to unlock a module in the unit.suite.yml file. After doing that, the file should look as on the example below:
Now we can start writing a test, which will check whether a backup and migrate module is turned on in Drupal.
<?php

class ExampleUnitTest extends \Codeception\Test\Unit
{
    /**
     * @var \UnitTester
     */
    protected $tester;

    protected function _before()
    {
    }

    protected function _after()
    {
    }

    /**   TESTS     */

    public function testModulesEnabled()
    {
    	$modules[] = 'backup_migrate';

    	foreach ($modules as $modules_name) {
    		$result = module_exists($modules_name);
    		$this->assertEquals(TRUE, module_exists($modules_name));
    	}
     }
}
If you would like to learn more about unit tests, you should visit: http://codeception.com/docs/05-UnitTests
Launching tests
After getting all the tests written and ready, all that remains is launching them and seeing them work. Remember that before launching the tests you have to start the project containers (dcon up). You can launch the tests in several ways:
- all tests written by us,
dcon test - only a given set of tests, e.g.
dcon test acceptance - a single file with tests, e.g.
dcon test acceptance/ExampleFilet.php - a single test, e.g.
dcon test acceptance/ExampleFile.php::ExampleTest
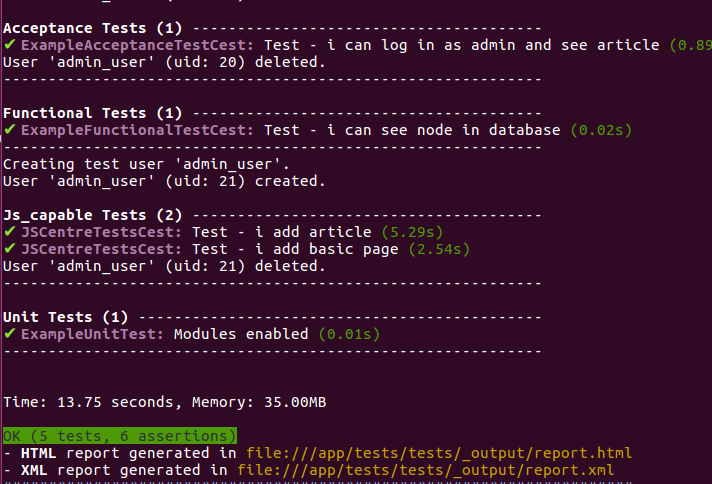
After launching the tests using “dcon test” command, you should see the tests getting executed, and at the very end see something resembling the image below.
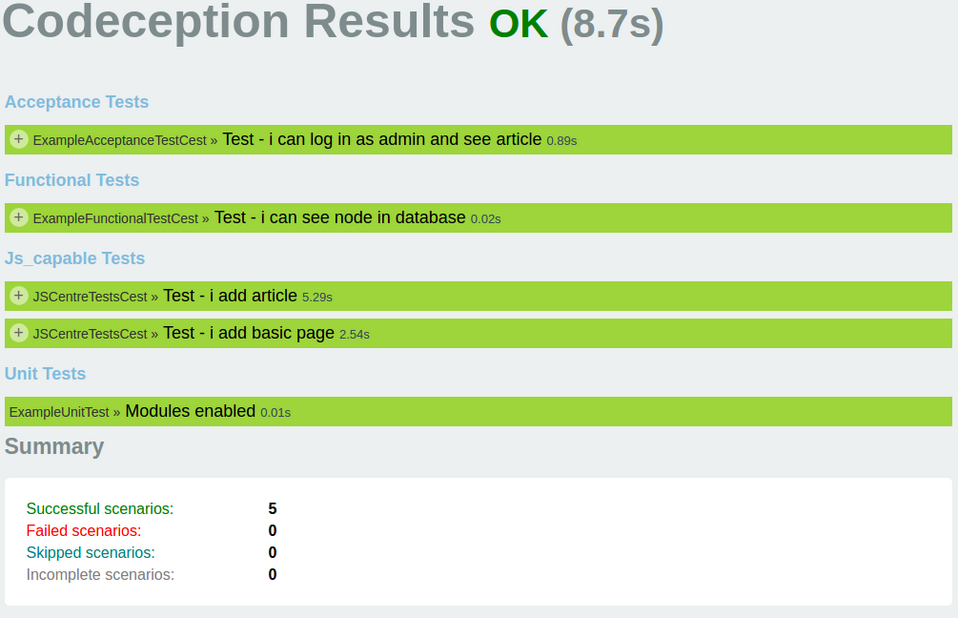
Reports
Of course, Codeception does not leave you only with what you see in the console. After completing the tests, the output folder will contain a report in XML and HTML format. After clicking on the plus sign next to a given test, the report will show all the steps carried out during said test.
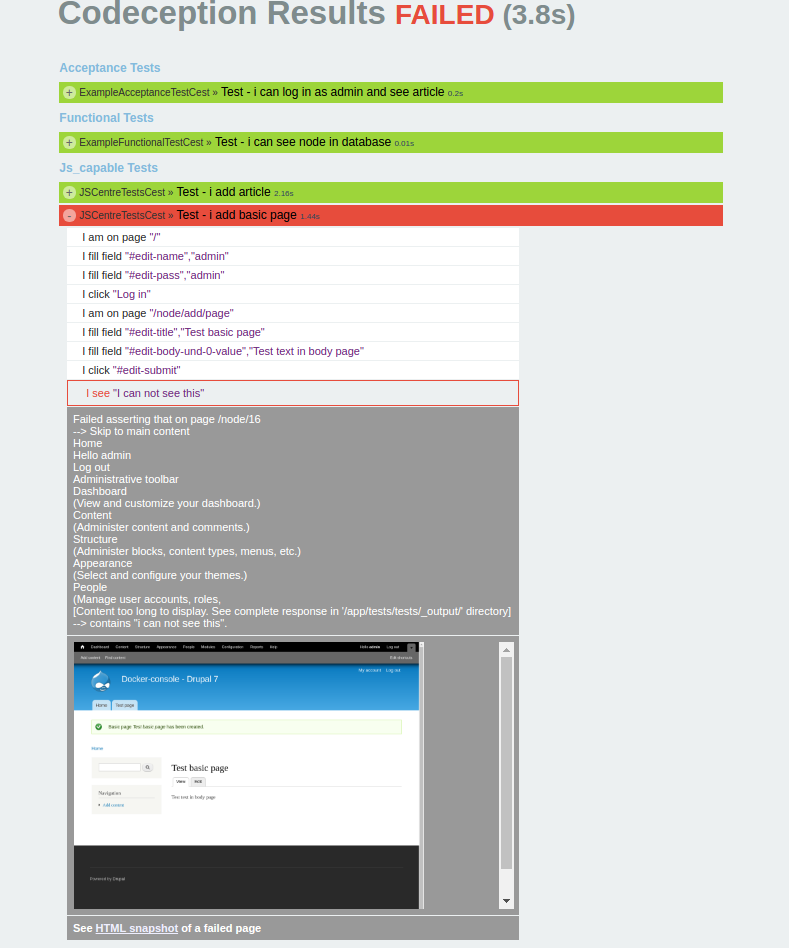
Now let us try to change something on our website or in our tests in order to get an error. As you can see, whenever an error occurs, Codeception marks the exact step where the error happened. Additionally, since the test was carried out in a browser using WebDriver, we have a screenshot attached, along with a short description of the problem. If any of the acceptance tests fail, you will have an HTML file containing the code at the moment when the error occurred.
Project files
You can run the examples described in this article by downloading them from the product repository and changing the branch to codeception-start.
Project repository:
https://github.com/DropticaExamples/docker-console-project-example
Database dump:
https://www.dropbox.com/s/tcfkgpg2ume17r3/database.sql.tar.gz?dl=0
Project files:
https://www.dropbox.com/s/hl506wciwj60fds/files.tar.gz?dl=0
Conclusion
I hope that after reading this text you will know how to start your adventure with Codeception and that I encouraged you at least a little bit. In the end, I am going to give you a few tips and guidelines regarding writing tests:
- always remember about assertions in tests, because a test that doesn’t check anything is not a test,
- always try to write stable tests (choose element selectors in a way that allows the test to always locate them explicitly – no one wants false positives and negatives,
- try to write several smaller tests, rather than one big one, because if something breaks, the remaining tests will have an opportunity to check the page further,
- try to write independent tests, and if this is impossible, tell the system (e.g. by using @depends note) to pass to another test should the test fail.
- Do not try to automate everything you do – this is something for another article or a book, even, but no matter what you do, before writing each test you should think whether or not you actually need it,
- if you are reusing a piece of code more than once, think about getting it into a separate function,
- try not to use fixed selectors and URLs in your tests (use Page Object Pattern – we will try to write more about it soon.)