
Droopler 1.4 Upgrades to Version 2.0

Droopler version 2.0 has recently been released, which has brought a lot of new features. We decided to introduce some major changes to improve the editorial work, which is why the upgrade from the previous 1.4 version is a complex process and requires the attention of the programmer.
I will describe here all the steps needed to migrate to Droopler 2.0. I will divide this guide into two parts, depending on the installation method. It will be useful for the people using Composer, and to those who prefer distribution packages from drupal.org.
The summary of the information provided here can be found in the documentation. Remember to make a backup before taking any action.
Droopler installed via Composer
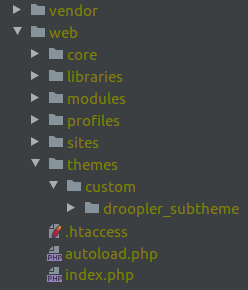
From the very beginning of Droopler's existence, the preferred way to install it was by using Composer. The pages installed according to our recommendations have the following structure in the main directory:
Downloading version 2.0 along with the dependent modules
The first, most important step is to download the new version of Droopler (with the accompanying modules) using the command:
composer update droptica/droopler --with-all-dependencies
1) Updating the droopler_subtheme skin
The second step will be adapting the existing droopler_subtheme skin to operate within the new version. First make sure that the list of regions in the droopler_subtheme.info.yml file is identical to the following:
regions:
regions:
  header: Header
  secondary_menu: 'Secondary menu'
  primary_menu: 'Primary menu'
  lang_menu: 'Language menu'
  page_top_content: 'Page top'
  page_top: 'Page top'
  page_bottom: 'Page bottom'
  page_bottom_content: 'Page bottom'
  highlighted: Highlighted
  featured_top: 'Featured top'
  breadcrumb: Breadcrumb
  admin_tabs: 'Admin tabs'
  content: Content
  facets_top: 'Facets top'
  facets_left_top: 'Facets left top'
  facets_left: 'Facets left'
  sidebar_left: 'Sidebar left'
  sidebar_right: 'Sidebar right'
  featured_bottom_first: 'Featured bottom first'
  featured_bottom_second: 'Featured bottom second'
  featured_bottom_third: 'Featured bottom third'
  footer_first: 'Footer first'
  footer_second: 'Footer second'
  footer_third: 'Footer third'
  footer_fourth: 'Footer fourth'
  footer_fifth: 'Footer fifth'
  footer_sixth: 'Footer sixth'
  footer_main: 'Footer Main'
Next, go to the droopler_project repository page and replace the following files in your skin with newer versions – taking care not to delete your own modifications:
- gulpfiles.js
- package.json
Delete the package-json.lock file and run the following commands:
- npm install in the profiles/contrib/droopler/themes/custom/droopler_theme directory,
- gulp compile in the profiles/contrib/droopler/themes/custom/droopler_theme directory.
- npm install in the themes/custom/droopler_subtheme directory,
- gulp compile in the themes/custom/droopler_subtheme directory.
2) Restoring the old colour scheme
Version 2.0 has a new colour scheme – blue has been changed to dark red. If you want to restore the previous colour scheme, locate the following file:
themes/custom/droopler_theme/scss/config/_old_color_scheme.scss
Copy its contents into the _colors.scss file in your droopler_subtheme skin.
3) Carrying out the migration of the Composer template
With the release of Drupal 8.8, the official Composer template has been made available; it is slightly different from the previous one, used also in Droopler 1.4. If you prefer the latest solutions, upgrade your composer.json file to the one available in the droopler_project repository. If your version does not differ from the original, you can simply replace this file with the newer version. After making the changes, delete the scripts/composer and drush directories.
4) Updating the database
I will present the process of updating the database at the end of the article, as it is the same for all types of installations.
Droopler installed from Drupal.org
Installing Droopler from the package on the drupal.org website is very simple; however, the upgrade process requires some additional, more difficult steps. The difficulty level will vary depending on whether Drupal and external modules were updated after installing version 1.4.
First, download the newest Droopler 2.0 version from https://www.drupal.org/project/droopler.
1) Updating Droopler to the new version
Let us start by updating Drupal itself. Replace the core and vendor directories with those from the file you have just downloaded. Download version 1.6 of the Pathauto module (from this address) and replace the existing version of this module from the modules/contrib/pathauto directory (there will still be time to upgrade to the latest version). Run the /update.php upgrading script.
2) Updating the modules to the new version
Now it is time for the modules. Delete all directories except the menu_link_attributes from the modules/contrib directory and replace them with the modules from the package from drupal.org, from the profiles/droopler/modules/contrib directory. Next, run the /update.php script.
If you will get an error in the Paragraph module, remove the paragraphs_update_8017() function from the modules/contrib/paragraphs/paragraphs.install file and run the /update.php script again.
3) Removing the obsolete modules and profiles
The first step to updating Droopler will be to remove the old code:
- Delete the following directories from the main directory: drupal_config, drush, libraries, profiles, scripts, as well as all files. Leave the modules, sites and themes directories. Make sure not to delete the files and directories added by you.
- Remove the following modules from the modules/contrib directory : admin_toolbar, better_exposed_filters, checklistapi, colorbox, config_update, contact_formatter, ctools, entity_reference_revisions, facets, features, field_group, geysir, google_analytics, google_tag, link_attributes, linkit, metatag, paragraphs, pathauto, redirect, search_api, simple_sitemap, smtp, svg_image, token, tvi. Leave the menu_link_attributes module (you can also use this opportunity to update it to the new version from the https://www.drupal.org/project/menu_link_attributes page).
4) Uploading the version 2.0 files
Upload the remaining files from the Droopler 2.0 package from drupal.org to your website. Be careful not to overwrite the core, modules, sites, themes, and vendor directories.
5) Updating the database
Go to the end of the article to learn more about this topic.
If you encounter an error due to a missing droopler_theme skin, run in the database a query (e.g. via phpMyAdmin) rebuilding the paths in the system (the drupal_flush_all_caches() function will do the same):
SELECT * FROM `key_value` WHERE `name` LIKE 'system.profile.files'
6) Customising the skin
If the droopler_subtheme skin you use does not differ from the original, you can change it to Droopler Theme 8.x-2.0 (click on Appearance in the top menu).
If your droopler_subtheme skin has been modified, upgrade it to version 2.0. If you are using SCSS, check out the beginning of this article for a description of the skin migration procedure for installations with Composer. It is almost identical for the installations from drupal.org.
If your modifications are minor and you do not want to waste time updating your skin, build it from scratch. In the profiles/droopler/themes/custom/droopler_theme directory, you will find the STARTERKIT_SCSS and STARTERKIT_SCSS subdirectories containing skin templates for the users who use and do not use an SCSS compiler, respectively. Every template contains a README.md file with instructions.
Database update
Droopler 2.0 includes the complete upgrade path from version 1.4. It includes:
- Incorporation of new paragraphs
- Organising and enriching the existing paragraphs with new fields
- Replacing all images with Media
- MegaMenu configuration
- Optimisation procedures
You can run the update via the /update.php script or by running the command
drush updb
After the update, you will see the following message:
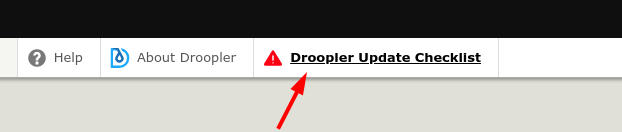
It means that not all operations could have been carried out automatically. Review the checklist for unselected items. In order to carry out the given update yourself, follow the instructions from the list.
Summary
Judging by the number of steps shown above, upgrading to version 2.0 is a fairly complex process. If you have any problems, please submit a ticket on the Droopler's page on drupal.org. The development team and their associated community are very active, so no question will remain unanswered.