Working with the Laravel Database - 8 Useful Tips

Laravel is known for its high intuitiveness and comfort of code-writing. Many things were designed by the Laravel creators to simplify the programmers' work with this framework. It’s the same when working with the database. The documentation will be a valuable source of information for you. However, in this text, I'll show you the aspects that aren’t included there. Thanks to them, your work with the database in Laravel will reach a higher level.
Database connection
Before starting work on a new project, you should configure the connection with the database in Laravel. As you may have guessed, it’s very simple. In the main project directory, in the .env file, you just have to enter the database access data:
DB_CONNECTION=mysql
DB_HOST=127.0.0.1
DB_PORT=3306
DB_DATABASE=”your_db_name”
DB_USERNAME=”your_db_user”
DB_PASSWORD=”your_db_pass”
Of course, you must have a MySQL server running and an appropriate database created. Sometimes, however – especially when starting a new small project – it’s worth using SQLite instead of MySQL. In order to do this, create a database/database.sqlite file, and then replace the above entry in the .env file with the following:
DB_CONNECTION=sqlite
When everything is configured, you can focus on improving your work with the database.
1. DB::transaction()
Suppose you have an application in which the user can use a payment gateway to buy points that change the status of their account from “limited” to “premium”. For the purpose of this example, let’s assume that the payment registration data, the points and the account status are kept in three separate tables. Your controller will look something like this:
public function store()
{
    Payment::where(['user_id' => auth()->user()->id])->update(['payment_success' => 1]);
    UserPoint::create([
        'user_id' => auth()->user()->id,
        'points' => 1000,
    ]);
    UserStatus::where(['user_id' => auth()->user()->id])->update(['status' => 'premium']);
}
However, what happens if for some reason the second or third operation where you add points and then change the status fails? Your database in Laravel will become inconsistent. The DB::transaction() method comes to the rescue – thanks to which, in the event of an error, your data will be restored to the previous state:
{
    DB::beginTransaction();

    try {
        Payment::where(['user_id' => auth()->user()->id])->update(['payment_success' => 1]);
        UserPoint::create([
            'user_id' => auth()->user()->id,
            'points' => 1000,
        ]);
        UserStatus::where(['user_id' => auth()->user()->id])->update(['status' => 'premium']);

        DB::commit();
    } catch (\Exception $e) {
        DB::rollBack();
    }
}
2. Database query - replace the if condition with the when condition
Very often, when building a query to a database using Eloquent, you want to add some condition. A good example would be to load all users from the database or all users with active/inactive status if the URL contains the “active” parameter.
public function index()
{
    $users = User::orderBy('name', 'ASC');

    if (request()->has('active')) {
        $users->where('active', \request('active'));
    }

    $users->get();
}
However, not everyone knows that the same condition can be written without using an if block, but using Eloquent only:
public function index()
{
    $users = User::orderBy('name', 'ASC')
        ->when(request()->has('active'), function ($query) {
            $query->where('active', request('active'));
        })
        ->get();
}
3. Extending the model with additional data
Let’s assume that you keep the data about the products in a store in the products table. The price column shows the price of the product in the form of a natural number given in cents. Therefore, a product that costs 2 EUR is written as 200 (200 cents). This is a very popular, generally accepted practice. Of course, you won’t display the price in cents to the user – you must convert it first. This operation can be performed using the accessor in Eloquent. Everything is very well described in Laravel’s documentation.
However, what if you want to convert the price in euros to other currencies and include it in the set of product data that Eloquent returns? You can also use the accessor for this purpose.
Therefore, if you want price information in other currencies to be included in the prices attribute, you need to create a public getPricesAttribute method and then create a $appends table in the model containing the attribute name (in this case, it will be prices). Here’s what the whole thing should look like:
class Product extends Model
{
    protected $appends = ['prices'];

    public function getPricesAttribute()
    {
        return [
            'EUR' => $this->price,
            'USD' => $this->price, // Use some kind of currency converter here.
            'GBP' => $this->price, // Use some kind of currency converter here.
        ];
    }
}
Important: if the attribute’s name consists of two or more words, e.g. “converted prices”, the method name should be saved in accordance with the standard in the camel case format (getConvertedPricesAttribute), and the name in the $appends table is saved in the snake case (converted_prices) format.
4. Automatic deletion of relationships in the Laravel database
The most common database relationship is the one-to-many relationship. Suppose you have information about the user in the users table, and you store information about the contacts that the user created on their profile in the contacts table. When creating an application, you always have to keep in mind what will happen to it in a few years. Then you should make sure that when the user deletes their account, all data associated with them in other tables will also be deleted. Otherwise, the database may reach the size of even a dozen or so gigabytes after a few years, and this will become a big problem.
You can set up the automatic deletion of relationships in several ways, but my favourite is to define it at the migration level.
This is what the contacts table migration looks like:
public function up()
{
    Schema::create('contacts', function (Blueprint $table) {
        $table->id();
        $table->unsignedBigInteger('user_id');
        $table->string('fist_name');
        $table->string('last_name');
        $table->string('address');
        $table->string('email');
        $table->timestamps();
    });
}
The user_id column obviously refers to the id of the user who created the contact in the contacts table. Therefore, you need to define this relationship in the migration, along with the appropriate information on what to do with the data in the event of a record deletion.
public function up()
{
    Schema::create('contacts', function (Blueprint $table) {
        $table->id();
        $table->unsignedBigInteger('user_id');
        $table->string('first_name');
        $table->string('last_name');
        $table->string('address');
        $table->string('email');
        $table->timestamps();

        $table->foreign('user_id')
            ->references('id')
            ->on('users')
            ->onDelete('cascade');
    });
}
5. Using map() instead of foreach
I’ve earlier mentioned the accessors, thanks to which you can modify the data downloaded from the database. This method works well if you want to obtain the data in a changed form every time. But what if you want to make modifications only in one case? Let’s return to the example with the products the prices of which are written in the form of a natural number. Let’s assume that this time you want to convert cents into euro and add the ‘currency’ attribute containing information about the currency. Of course, you can use a foreach loop for this:
class ProductController extends Controller
{
    public function index()
    {
        $products = Product::all();

        foreach ($products as $product) {
            $product->price = $product->price / 100;
            $product->currency = 'EUR';
        }
    }
}
However, as usually is the case with Laravel, the creators of this framework have prepared a more elegant solution. You can use the map() method instead of a foreach loop:
class ProductController extends Controller
{
    public function index()
    {
        $products = Product::query()->get()->map(function (Product $product) {
            $product->price = $product->price / 100;
            $product->currency = 'EUR';

            return $product;
        });
    }
}
6. More convenient search by date
In accordance with the convention, the dates in Laravel are written in the Y-m-d H:i:s format. This allows you to conveniently search for records over a specific period of time using the whereDate, whereMonth, whereDay, whereYear or whereTime methods. Check out the examples below:
$products = Product::whereDate('created_at', '2018-01-31')->get();
$products = Product::whereMonth('created_at', '12')->get();
$products = Product::whereDay('created_at', '31')->get();
$products = Product::whereYear('created_at', date('Y'))->get();
$products = Product::whereTime('created_at', '=', ’14:13:58')->get();
7. N+1 problem
Creating relationships between tables is extremely simple in Laravel. The solutions used in this framework have many advantages, but they aren’t without any disadvantages. Let’s go back to the one-to-many example shown earlier, where there are multiple contacts assigned to one user. Defining the relationship goes like this:
class User extends Authenticatable
{
    public function contacts()
    {
        return $this->hasMany(Contact::class);
    }
}
Next, let’s assume that you want to load all users and display the contacts related via relationship:
public function index()
{
    $users = User::all();

    foreach ($users as $user) {
        echo $user->name;

        foreach ($user->contacts as $contact) {
            echo $contact->last_name;
        }
    }
}
Unfortunately, what makes it easier for you to work with the database thanks to Eloquent, also means that you don’t know exactly what is really going on “undercover”. Fortunately, another great Laravel tool – Telescope – comes to help. Thanks to it, you can see exactly what the database query looks like in this case:
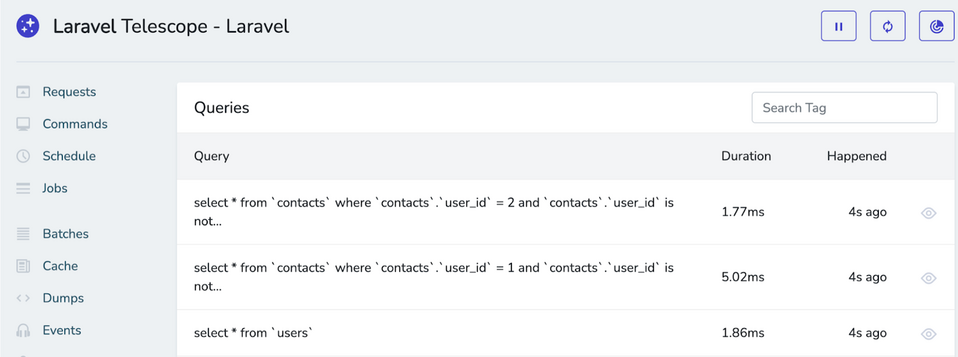
As you can see, Laravel first loads all users from the users table, and then performs a separate contacts table query for each user. This is a major issue in terms of performance. In the case of a larger number of users, you will have a whole lot of unnecessary database queries. Fortunately, the solution is very simple. You need to change the all() method to with() in order to declare that you want your results to be loaded along with the data in the ‘contacts’ column.
public function index()
{
    $users = User::with('contacts')->get();

    foreach ($users as $user) {
        echo $user->name;

        foreach ($user->contacts as $contact) {
            echo $contact->last_name;
        }
    }
}
8. Sorting the data in a relationship
For the purpose of the last example, let's go back to the user and their contacts once again. It’d be useful to display the contacts sorted alphabetically. Of course, you can do it like this:
$users = User::with(['contacts' => function ($query) {
    $query->orderBy('last_name', 'ASC');
}])->get();
However, you can safely assume that each time you load this data, you’ll need to sort it in this exact way. What can you do so that you don’t have to repeat this step? Let’s take another look at what the relationship definition looks like in the model:
public function contacts()
{
    return $this->hasMany(Contact::class);
}
This is where you need to add the orderBy method so that your results are sorted in the right way every time:
public function contacts()
{
    return $this->hasMany(Contact::class)
        ->orderBy('last_name' ,'ASC');
}
Stay up-to-date with Laravel
Laravel is known for many convenient solutions. That’s why it’s worth to constantly expand your knowledge and learn new techniques that’ll facilitate work with this system. Subsequent versions of this framework are being released systematically, often bringing a whole lot of new functionalities that our Laravel developers willingly explore.