Laravel - Intuitiveness and Speed of Writing Code

Laravel and Symfony are the frameworks compared very often, and there is a lot of discussion about them in the forums. Today, however, I do not want to focus on comparing, but on showing the advantages of Laravel and describing what made the greatest, obviously positive impression on me.
Artisan is your best friend
Artisan is the CLI attached to Laravel. Thanks to it, with the appropriate command you can quickly perform many activities that would normally take you a lot of time. What activities are these? I wrote about them further down.
Frontend presets / Laravel UI
Configuring the right frontend technology can take a long time, especially if it is your first time doing this. When adopting Laravel at the very start, you can use the three available presets: bootstrap, vue or react. With the help of the aforementioned artisan, you can quickly choose which technology you will use in the project. For the sake of this example, let us assume you need to react. Up to version 5 of Laravel, you needed to use just a single command for this purpose:
php artisan preset react
Since version 6, first, you need to install Laravel UI package using a composer:
composer require laravel/ui
and then choose the right set for your project, e.g.:
php artisan ui react
That is not all, however, because you are not limited by just these three technologies. You can add our own presets (e.g. tailwindcss), and on GitHub, you can find many examples of how to do this.
Authentication
Every currently developed application must have a login, user registration and password recovery system. Creating everything from scratch does not make a lick of sense. You can also use ready-made solutions, but in the case of Laravel, it was impossible to simplify things anymore.
Up to version 5, you needed to use just a single command
php artisan make:auth
Since version 6, you have to use the Laravel UI package again
php artisan ui:auth
The above command will create the appropriate paths in routing, controllers, and views for the logged-in and not logged-in people. However, if this is still not enough for you, you can also create login, registration, and password recovery forms:
php artisan ui react –auth
Eloquent
This is perhaps the greatest advantage of Laravel. Eloquent is an ORM based on the ActiveRecord model. It allows you to work with the database in a very intuitive way. Thanks to it, you can forget about writing raw SQL queries, and working with the database becomes incredibly pleasant. Let us take a look at a couple of examples below:
User::where(‘first_name’, ‘Andrzej’)→orderBy(‘last_name’, ‘DESC’)→get();
The above code does not actually require any comment: Download the users whose first name is Andrzej and sort the results by their last name. If, however, instead of a list of all users, you only need the first result, just replace get() with first():
User::where(‘first_name’, ‘Andrzej’)→orderBy(‘last_name’, ‘DESC’)→first();
Also, you will often need to display a 404 error page in the case if you cannot find any record in the database. In this variant, you just need to replace where with findOrFail
User::findOrFail(‘first_name’, ‘Andrzej’)→orderBy(‘last_name’, ‘DESC’)→get();
The above examples are just a glimpse of what Eloquent can do. You can just as easily create, edit, or delete records in the database. It is also possible to create relationships between tables: one-to-one, one-to-many or many-to-many.
Migrations
As another example, I would like to present creating, editing, and deleting tables in a database. Suppose you need to create a new table with products that will be in a store. For this purpose, you will also need a model that will be responsible for handling the data. You create everything with a single command:
php artisan make:model Product –migration
The Product.php model will be created in the app/model’s directory (or app in the case of Laravel 7 or earlier). Flag – migration means that you have additionally created a migration for this model, which is located in the database/migration’s directory. In the up() method you define the name of the table and the type of data. For example:
public function up()

{

   Schema::create('products', function (Blueprint $table) {

      $table->id();

      $table->string('name');

      $table->text('description');

      $table->float('price');

      $table->integer('stock');

      $table->tinyInteger('isActive');

      $table->timestamps();

   });

}
The timestamps method will create additional created_at and updated_at columns, which will be automatically completed with the appropriate data when the record is created or changed.
Finally, to create the above table in a database, you need to execute:
php artisan migrate
or
php artisan migrate:fresh
to delete all the previous data and recreate the entire table structure from scratch.
It is worth to add here that the name of the tables was created based on the model (Product) and automatically changed from singular to plural form (products).
Database seeders
When our Laravel developers create new applications while providing PHP development services to our clients, we often encounter the need to supplement the database with test data, e.g. such as: users, blog entries or products in the store. The PHP Faker library works great for this purpose, but also in this case the Laravel developers went a step further and present ready-made solutions. For example, suppose you need to create one hundred users in the database.
First, you need to create a database factory using the command:
php artisan make:factory UserFactory -m User
If you go to the database/factory path, you will see that a new UserFactory.php file has been created. In this very file – and more specifically in the definition() method – you will define what fields and what data in the user's table you will fill out.
public function definition()

{

   return [

      'first_name' => $this→faker→firstName,

      'last_name' => $this->faker->lastName,

      'email' => $this->faker->unique()->safeEmail,

      'email_verified_at' => now(),

      'password' => '$2y$10$92IXUNpkjO0rOQ5byMi.Ye4oKoEa3Ro9llC/.og/at2.uheWG/igi',

// password

      'remember_token' => Str::random(10),

   ];

}
Of course, the name of the keys in the table must match the names of the columns in the table in the database.
The next step is to create a seeder. Again, you need to use artisan for this purpose.
php artisan make:seeder UsersTableSeeder
In the newly created database/seeders/UsersTableSeeder.php file, you only need to define how many users are to be created.
public function run()

{

   \App\Models\User::factory()->count(100)->create();

}

Finally, in the database/seeders/DatabaseSeeder.php file you need to add:

public function run()

{

   $this->call(UsersTableSeeder::class);

}
And that is it! Of course, you launch the seeder using artisan:
php artisan db:seed
E-mail messages
Configuring and styling good-looking e-mail messages takes hours of work. However, here also everything is simplified as much as possible. Of course, you should start with the command:
php artisan make:mail HelloWorldMail –markdown emails.hello-world
Thanks to it, two files were created. Firstly: if you go to resources/views/mails/hello-world/blade.php, you can edit your e-mail message. Secondly: an \App\Mail\HelloWorldMail class has been created, that you need to use when sending a message. You can also transfer variables to the hello-world.blade.php view there, such as the name of the user to whom you send the message.
Integration with mialgun or mailtrap is also very simple. In the case of the latter, it is enough to enter the login and password in the .env file.
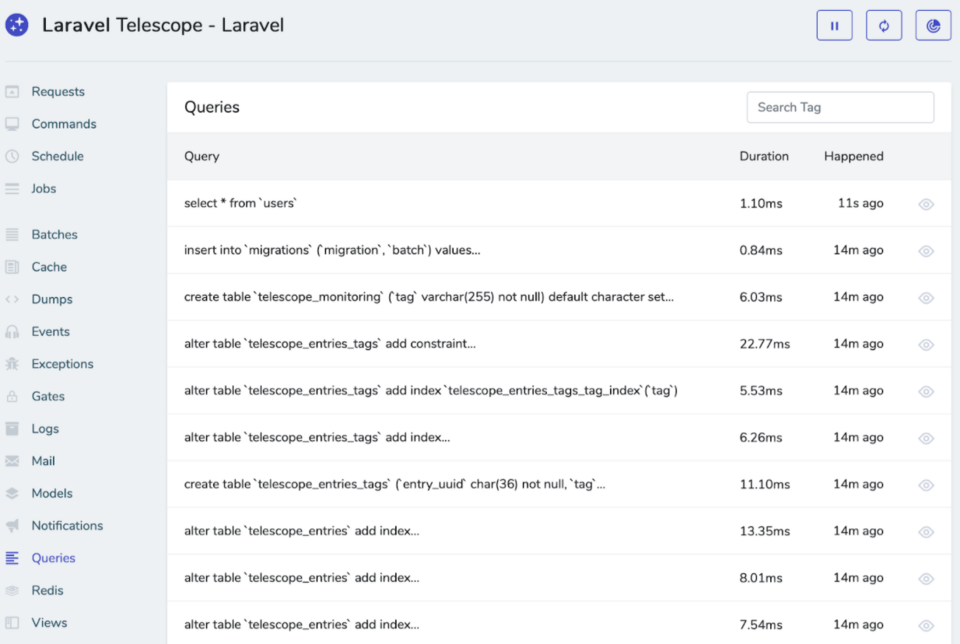
Telescope
Finally, I would like to present a great tool that allows you to debug and optimise your application. Thanks to Telescope you can see what is really going on "in the background" during Laravel's operation. You install Telescope using three commands:
composer require laravel/telescope
php artisan telescope:install
php artisan migrate
Now just go to /telescope and you will have access to requests, commands executed with artisan, errors, logs, database queries and many more. I would recommend that everyone spend a little more time familiarising themselves with this tool.
Summary
We use Laravel at Droptica on a daily basis. Thus, I am glad that, as you can see in the examples above, many time-consuming processes during application development have been simplified as much as possible. Moreover, an efficient code writing mainly boils down to knowing artisan commands, which will do most of the work for you. Laravel's documentation has also been prepared in a very simple and clear way, and you can find many helpful threads on forums such as StackOverflow or Laracasts.
Presented below are links to the documentation of specific aspects discussed in this article: