
Browsersync - your test assistant

When creating websites, you probably sometimes saw how your page changes its appearance on different browsers, not to mention a variety of devices. Depending on how many different configurations we will want to check, the amount of time spent on testing them will grow rapidly and the enthusiasm will probably decrease at a similar rate with repeating the same action on another device. However, thanks to Browsersync, an action can be performed simultaneously not only on multiple browsers but also on several different devices.
How does it work?
Browsersync runs a small server, injecting each page with a script that allows them to communicate with the server using the WebSocket technology. If certain events occur on the site, such as CSS file modification, moving between pages, scrolling the page, entering data into a form, etc., the server communicates it to all connected devices. Thanks to this - regardless of on which device and action is being performed - the information is being received by all of them. You as a user do not need to know about anything because it all happens "automagically".
How to start?
First, we have to install Node.js and Browsersync. Installation of Node.js (the commands shown below were tested on Linux, users of others systems should check projects' websites),
curl -sL https://deb.nodesource.com/setup_7.x | sudo -E bash

apt-get install -y nodejs
Global installation of Browsersync
npm install -g browser-sync
there is nothing left to do but starting the server and checking its operation. We can do these in two ways, depending on what kind of project it is. For static pages it will be:
browser-sync start --server --files "css/*.css"
In the case of dynamic pages, when you use a local WWW server, you will have to start Browsersync in proxy server mode:
browser-sync start --proxy "myproject.dev" --files "css/*.css"
After executing one of the commands shown above, a code similar to the one below should appear in your console. At the same time, Browsersync should open on your default browser the project page with already launched the changes tracking service
[BS] Proxying: http://127.0.0.1

[BS] Access URLs:

-------------------------------------------

      Local: http://myproject.dev:3000

   External: http://192.168.1.1:3000

-------------------------------------------

         UI: http://localhost:3001

UI External: http://192.168.1.1:3001

-------------------------------------------

[BS] Watching files…
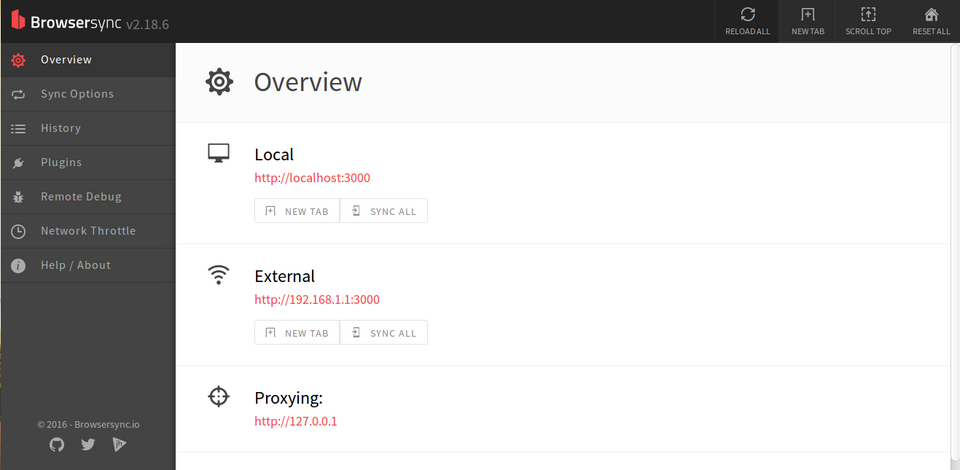
The first two addresses (Local and External) should lead to the main page of your project. Except that - as the name suggests - the first one can be used only for communication between browsers within your computer, on which the service was launched. The second one should work under a given network and you can use it for communication with other devices e.g. by connecting the phone to a Wi-Fi network that is used by your computer. The scope of operation for the next two addresses is identical to those shown above; however, these addresses lead to a UI screen (shown in the picture below), which allows us, to among other things:
- check the addresses of our server,
- check which devices are connected to it,
- start another server for our project and perform its configuration,
- set which actions on the page are being tracked,
- check web history,
- get information on installed plug-ins,
- turn on the options that will help us in debugging.
Browsersync not only for testers
Because Browsersync allows you to track changes in CSS and HTML on the pages without a need to reload, it seems to be a great tool supporting the work of developers. If you use Grunt or Gulp in your work, you should not have any problems with adding Browsersync to your environment. It will help you save time and reduce the possibility of being surprised with how your website works with different browser resolutions.
Browsersync and Docker
I want to reassure all those who like us like Docker, (if someone does not know it - I recommend visiting project's page) that it is possible to use docker images with Browsersync. Although there is currently no official image available, I can safely recommend ustwo/browser-sync , which is currently the most popular. In this case, there is no need to install anything besides Docker, the installation of which we have already covered in our blog - You just need to launch the server, as in the previous case, by using one of two possible configurations.
For static pages:
docker run -dt
          --name browser-sync
          -p 3000:3000
          -p 3001:3001
          -v $(PWD):/source
          -w /source
          ustwo/browser-sync
          start --server --files "css/*.css"
For dynamic pages:
docker run -dt
          --name browser-sync
          --link myapp
          -p 3000:3000
          -p 3001:3001
          ustwo/browser-sync
          start --proxy "myapp:80" --files "css/*.css"
Where "myapp" is the name of a container with our WWW site.
At first glance, everything should launch in a similar way as in the configuration without Docker; however, keep in mind that in this case the external address (External) will be the address of the Docker's container and will not be visible to external devices without additional configuration.
Almost all Drupal development projects we work on in Droptica are built with Docker. Therefore, in this case, it is much more convenient for us to move the Browsersync launch to the docker-compose.yml configuration files and the Dockerfile file.
browser-sync:

 build: ./Dockerfiles/browserync

 links:

   - myapp:myapp

  volumes:
   - ./docker/config.js:/source/config.js
 command: start --proxy "myapp:80" --files "css/*.css" --no-ui --port 80

 environment:

     VIRTUAL_HOST: browsersync.{{HOST}}
The path shown above in a build parameter and means a place where the Dockerfile file is located. Whereas myapp is the name of a container with our WWW site. Virtual host works well in the case where on a given server we have more than one project that would want to use specific ports. You can also see that we gave up the screen for a UI configuration. However, this does not mean that we cannot change anything in the Browsersync settings. In this case, this is done by adding another parameter to the “command” (eg. --no-ui --port 8000) or overwriting the js file (./docker/config.js:/source/config.js), which should look similar to this one available in the image. If we do not want to overwrite the configuration, the volumes parameter should be deleted. The full command list is available in Browsersync's documentation.
Dockerfile:
FROM ustwo/browser-sync
EXPOSE 80
In the Dockerfile file, you just have to remember to expose a port so that ngnix will be able to redirect our service to the indicated address. Of course, it is possible to configure ngnix in a way enabling exposure by using a virtual host of both ports, allowing using the configuration service with the UI screen also. All of this depends on our current needs.
I hope that with this text I have convinced you at least a little to experiment with Browsersync and to think it over if it can help in your work.