Layout Builder Customization. Creating Custom Layout in Drupal

Layout Builder allows quickly creating website layouts from pre-built components added to sections. By default, Drupal provides four types of sections: one, two, three, and four columns. These columns have a predefined behavior the editors have no control over. Drupal offers the ability to create our own types of sections, so we can tailor them to fit our project. This is the process we'll show you in our article.
How to create a custom section in Layout Builder?
The first and most important step is to define the goals and thus, the list of functionalities that the section should provide. Then it's worth breaking the functionalities into small tasks that can be done in a specific time. The aim of our section will be to provide the ability to add classes to the main section wrapper and to individual regions.
As our base we'll use the template available in the Drupal Layout Builder module, which is the one that's used in the sections available with the module installation. Our task list should include:
- creating a custom module,
- the definition of a section in the layouts.yml file,
- the definition of a template for our sections and the plugin in which we'll embed the logic of adding our classes.
Creating a new module in Drupal
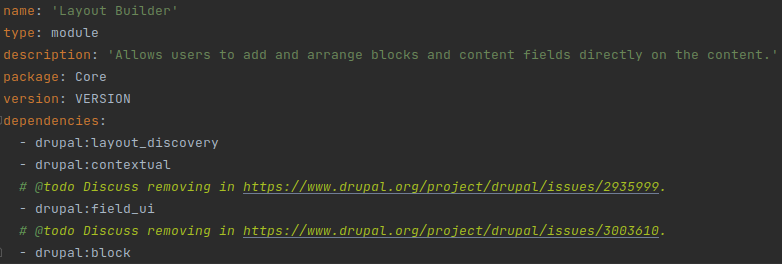
We have to create a standard *.info.yml file, as in every module. For a detailed description please refer to the documentation on Drupal.org.
# filename: custom_layout_builder.info.yml

name: Custom Layout Builder sections
description: Functionality which extends Layout Builder
core_version_requirement: ^9
type: module
package: custom
dependencies:
  - drupal:layout_builder
We know what the purpose of the module is because we've defined the required functionality. Therefore, already at this stage, we're sure that the list of dependencies should include at least the Layout Builder module. After defining the info.yml file, it's worth clearing the cache and checking if the module appears on the list. To do this, let’s go to the modules view and search for the module by the title or machine name. We should see our module with a list of required dependencies.

As we can clearly see, even though we've provided a dependency to the Layout Builder module only, their list is a bit longer. This is because the Layout Builder module has its own dependency list and it’s inherited by our module.
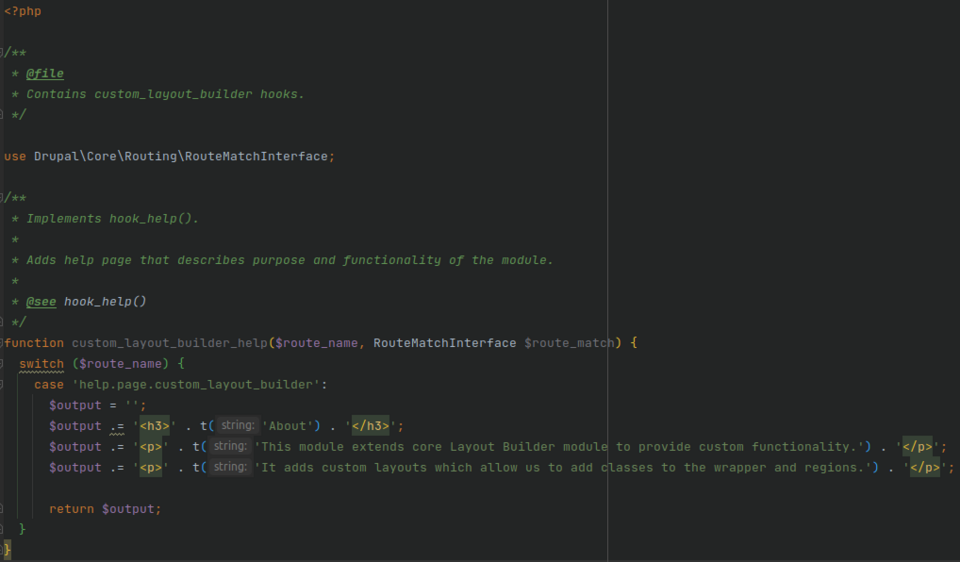
At this stage, it's worth considering the mental health of other developers (or yours, if you come back to this code after a few months) and starting to build its documentation. It's worth beginning with the implementation of the hook hook_help().
It's also a good idea to create a README.md file and keep it updated.
Section registration using *.layouts.yml
In order to register a new section, the easiest way is to add the *.layouts.yml file (where * is the machine name of our module). The file should be added in the main folder of the module, where we added the *.info.yml file.
Let's start with defining one section:
# filename: custom_layout_builder.layouts.yml

layout_custom_one_column:                 # Section main key
  label: '[CUSTOM] One column'            # Section title
  category: 'Custom layouts'
  path: layouts/custom_onecol_section     # Relative path from the template
  template: layout--custom-onecol-section # Template name
  default_region: first
  icon_map:
    - [first]
  regions:                                # Regions table
    first:                                # Region machine name
      label: First                        # Region title
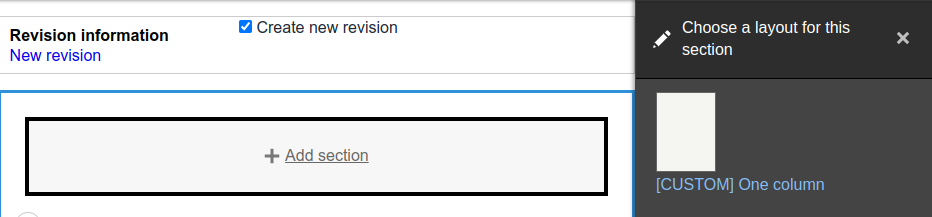
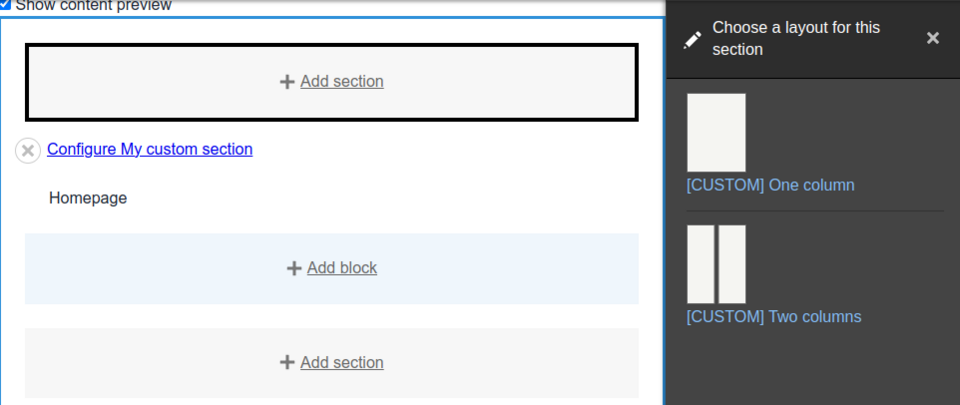
After the configuration, when adding sections, we should be able to see our newly defined section.
Section template defining
In order to be able to add a section, we still need to add the template whose name and path we've specified. In our case, we need to create the layouts/custom_onecol_section folder inside of which the layout--custom-onecol-section.html.twig file must be placed.
By default, the template will have access to four variables: content, attributes, region_attributes, and settings. If we don't put any block in the section, the content variable will return false after being cast to a boolean value. We can take advantage of this behavior to avoid displaying empty HTML tags. Inside the content variable, we'll find the keys corresponding to each defined region, and inside these regions are the blocks we've added. In the content variable, we'll only find the first key, because that's the only one we've defined. The behavior of content.first when casting to a boolean value is analogous to the behavior of the content variable. We'll use this to not display empty tags.
# filename:  layout--custom-onecol-section.html.twig

{#
/**
 * @file
 * Default implementation for a custom layout onecol section.
 *
 * Available variables:
 * - content: The content for this layout.
 * - attributes: HTML attributes for the layout <div>.
 * - region_attributes: HTML attributes for the region <div>.
 * - settings: An array of configured settings for the layout.
 *
 * @ingroup themeable
 */
#}
{% if content %}
  <div{{ attributes }}>

    {% if content.first %}
      <div {{ region_attributes.first }}>
        {{ content.first }}
      </div>
    {% endif %}

  </div>
{% endif %}
After adding the template, we should be able to easily add our section:
Defining the Layout plugin
From the end user's perspective, we haven't done anything so far, because the content editor will only see the new section title with the big [CUSTOM] prefix. This is because the section we've added works identically to the default one, provided with the Layout Builder module (with a small exception: our implementation doesn't add any classes). To change its behavior, we have to implement a new layout plugin.
Base class framework
The class should be in the src/Plugin/Layout folder. It'll be generic enough so that it can be used for any number of regions. The Drupal\Core\Layout\LayoutDefault class contains many base methods and implements the needed interfaces. As not to reinvent the wheel, we can expand it in our class.
# filename: CustomLayoutClassBase.php

<?php

namespace Drupal\custom_layout_builder\Plugin\Layout;

use Drupal\Core\Layout\LayoutDefault;

/**
 * Base class of our custom layouts with configurable HTML classes.
 *
 * @internal
 *   Plugin classes are internal.
 */
class CustomLayoutClassBase extends LayoutDefault {

}
Adding configuration options to a base class
One of the requirements is the possibility to select a class for the tag wrapping the section's regions. To achieve this, we have to first override the defaultConfiguration method and add a new configuration option to it.
/**
 * {@inheritdoc}
 */
public function defaultConfiguration() {
  $configuration = parent::defaultConfiguration();

  return $configuration + [
    'wrapper_classes' => '',
  ];
}
Then we should add the ability to specify a value for this configuration option. We can do this by overriding the buildConfigurationForm and submitConfigurationForm methods.
/**
* {@inheritdoc}
*/
public function buildConfigurationForm(array $form, FormStateInterface $form_state) {
$form['wrapper_classes'] = [
'#type' => 'textfield',
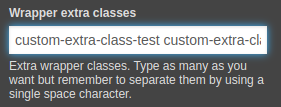
'#title' => $this->t('Wrapper extra classes'),
'#default_value' => $this->configuration['wrapper_classes'],
'#description' => $this->t('Extra wrapper classes. Type as many as you want but remember to separate them by using a single space character.'),
];
return parent::buildConfigurationForm($form, $form_state);
}
/**
* {@inheritdoc}
*/
public function submitConfigurationForm(array &$form, FormStateInterface $form_state) {
parent::submitConfigurationForm($form, $form_state);
$this->configuration['wrapper_classes'] = $form_state->getValue('wrapper_classes');
}
If there's a need to add form validation, it can be done by overwriting the validateConfigurationForm method. We recommend implementing validation for this field, as classes should comply with the Drupal Community standard. The Html::getClass() method may come in handy in this case.
Using configuration to build sections
The render array is created in the build method, and that's what we're going to overwrite now. If you remember the contents of the template we've added, you probably already know that we add classes to the attributes object.
/**
 * {@inheritdoc}
 */
public function build(array $regions): array {
  $build = parent::build($regions);
  $wrapper_classes = explode(' ', (string) $this->configuration['wrapper_classes']);
  $build['#attributes']['class'] = [...$wrapper_classes];

  return $build;
}
Using the base to create a Layout Plugin
Our class is ready, it's time to use it in a section. To do this, go back to the *.layouts.yml file to declare a new plugin. This is done by specifying the full namespace of the class under the class key.
# filename: custom_layout_builder.layouts.yml

layout_custom_one_column:
  label: '[CUSTOM] One column'
  category: 'Custom layouts'
  path: layouts/custom_onecol_section
  template: layout--custom-onecol-section
  class: '\Drupal\custom_layout_builder\Plugin\Layout\CustomOneColLayout'
  default_region: first
  icon_map:
    - [first]
  regions:
    first:
      label: First
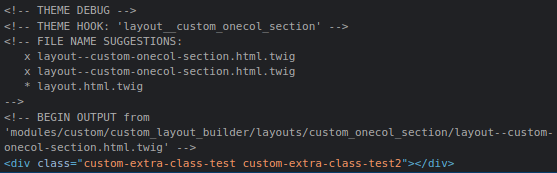
After introducing the above changes, you may notice that the section form has a new field and that the classes entered in that field are in the correct place in HTML.
Adding the option to select classes for regions
We can already define a class list for the wrapper element in our section. It's time to think about how to create the logic responsible for adding classes to individual sections of our layout. We should take into consideration the extensibility of our base class. That's why we recommend basing the logic of determining and accessing regions on the basis of the getRegionNames() method of the LayoutDefinition class.
1. First, we add one field to our form for each region:
/**
 * {@inheritdoc}
 */
public function buildConfigurationForm(array $form, FormStateInterface $form_state) {
  $form['wrapper_classes'] = [
    '#type' => 'textfield',
    '#title' => $this->t('Wrapper extra classes'),
    '#default_value' => $this->configuration['wrapper_classes'],
    '#description' => $this->t('Extra wrapper classes. Type as many as you want but remember to separate them by using a single space character.'),
  ];

  foreach ($this->getPluginDefinition()->getRegionNames() as $region_name) {
    $form['region_classes'][$region_name] = [
      '#type' => 'textfield',
      '#title' => $this->t('Extra classes for @region_name region', [
        '@region_name' => $region_name,
      ]),
      '#default_value' => $this->configuration['region_classes'][$region_name],
      '#description' => $this->t('Extra classes for the @region_name region wrapper. Type as many as you want but remember to separate them by using a single space character.', [
        '@region_name' => $region_name,
      ]),
    ];
  }

  return parent::buildConfigurationForm($form, $form_state);
}
2. We use a similar loop to write the value:
/**
 * {@inheritdoc}
 */
public function submitConfigurationForm(array &$form, FormStateInterface $form_state) {
  parent::submitConfigurationForm($form, $form_state);

  $this->configuration['wrapper_classes'] = $form_state->getValue('wrapper_classes');

  foreach ($this->getPluginDefinition()->getRegionNames() as $region_name) {
    $this->configuration['region_classes'][$region_name] = $form_state->getValue(['region_classes',
$region_name], '');
      }
}
3. The last step will be overriding the build method and embedding our classes in the appropriate Attributes class object.
/**
 * {@inheritdoc}
 */
public function build(array $regions): array {
  $build = parent::build($regions);
  $wrapper_classes = explode(' ', (string) $this->configuration['wrapper_classes']);
  $build['#attributes']['class'] = [...$wrapper_classes];

  foreach (array_keys($regions) as $region_name) {
    $region_classes = explode(' ', (string) $this->configuration['region_classes'][$region_name]);
    $build[$region_name]['#attributes']['class'] = [...$region_classes];
  }

  return $build;
}
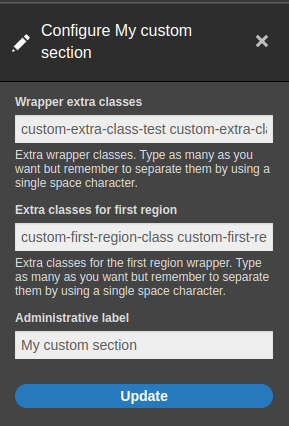
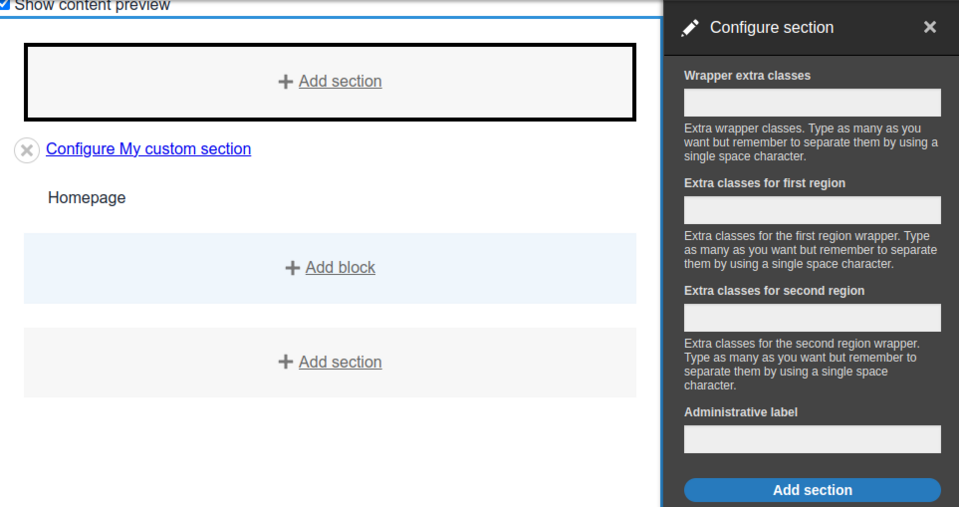
After our latest changes, we should see a new Extra classes for first region field where we can provide a list of classes we want to use.
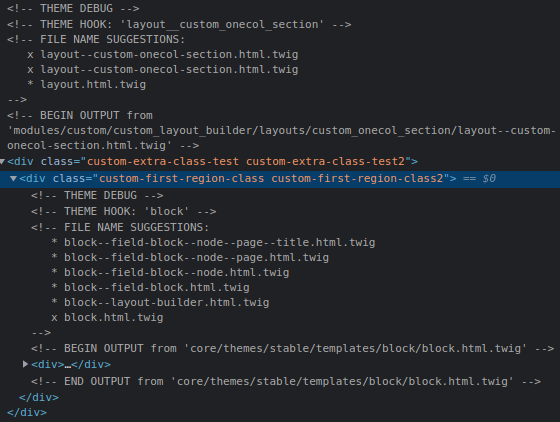
Keep in mind that the region will only appear if it's not empty. That's why we've added a test block containing the node's title. Let's see if classes are visible in HTML.
Creating different variants of sections
The code was written in such a generic way that adding a section with a different number of regions requires only the definition of the region and template from us. Let's add then a new section containing two regions.
First, we add the definition:
# filename: custom_layout_builder.layouts.yml

layout_custom_one_column:
  label: '[CUSTOM] One column'
  category: 'Custom layouts'
  path: layouts/custom_onecol_section
  template: layout--custom-onecol-section
  class: '\Drupal\custom_layout_builder\Plugin\Layout\CustomLayoutClassBase'
  default_region: first
  icon_map:
    - [first]
  regions:
    first:
      label: First
layout_custom_two_columns:
  label: '[CUSTOM] Two columns'
  category: 'Custom layouts'
  path: layouts/custom_twocol_section
  template: layout--custom-twocol-section
  class: '\Drupal\custom_layout_builder\Plugin\Layout\CustomLayoutClassBase'
  default_region: first
  icon_map:
    - [first, second]
  regions:
    first:
      label: First
    second:
      label: Second
And then we prepare the template:
# filename: layout--custom-twocol-section.html.twig

{#
/**
 * @file
 * Default implementation for a custom layout onecol section.
 *
 * Available variables:
 * - content: The content for this layout.
 * - attributes: HTML attributes for the layout <div>.
 * - region_attributes: HTML attributes for the region <div>.
 * - settings: An array of configured settings for the layout.
 *
 * @ingroup themeable
 */
#}
{% if content %}
  <div{{ attributes }}>

    {% if content.first %}
      <div {{ region_attributes.first }}>
        {{ content.first }}
      </div>
    {% endif %}

    {% if content.second %}
      <div {{ region_attributes.second }}>
        {{ content.second }}
      </div>
    {% endif %}

  </div>
{% endif %}
The section should be available now.
The configuration form should automatically adjust to the number of regions.
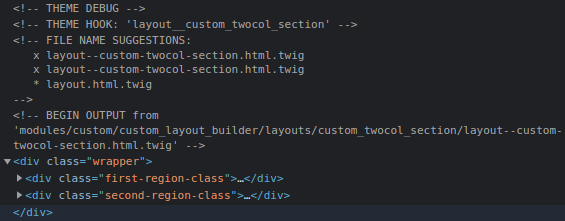
After configuring the form and adding test data, we can see the result of our operation in HTML.
The module created in this tutorial is available on our GitHub account.
Layout Builder customization - summary
Layout Builder is a great tool whose API allows for full freedom. As always with Drupal, if you can dream it, you can build it. The example shown in this article is only a small part of what can be achieved. If you're interested in the wider use of the Layout Builder API, it's worth reading about the Bootstrap Layout Builder module.
Do you need custom settings in your system? Check out how we can help you as part of our services related to Drupal development.