Recurring Payments in Drupal Commerce with PayPal. How to Set Up the Braintree Module?

Would you like to offer a recurring payment option in your online store? If so, this article is for you. You'll learn how to configure the Drupal Commerce Braintree module enabling payment processing through the Braintree gateway, how to link it to your PayPal account, and how to test and successfully launch this solution on your Drupal platform for online selling.
What is Braintree?
Braintree is an online payment service offered by PayPal that makes it easy to accept payments on websites and mobile apps. It provides support for various payment methods, including credit and debit cards, PayPal, Apple Pay, Google Pay, and others.
Braintree PayPal functionality includes:
- Seamless integration: Braintree ensures convenient SDKs (Software Development Kits), which are a set of tools that facilitate integration with various platforms and technologies.
- Multi-currency support: the service supports payments in more than 130 currencies, making it an attractive solution for companies operating in international markets.
- Advanced risk management tools: Braintree offers various risk management and fraud prevention tools, such as 3D Secure and Advanced Fraud Tools.
Braintree is, therefore, a comprehensive ecommerce solution that allows you to manage online payments in a simple and secure way.
Installing the required modules in Drupal Commerce
If you have followed my previous article on recurring payments/subscriptions in Drupal Commerce using the Commerce Recurring module as an example, you most likely already have all the required modules.
As a reminder, these are:
You install the modules by calling the command in the terminal:
composer require drupal/commerce_recurring drupal/commerce_braintreeOr by downloading it directly from drupal.org and unzipping it to the /modules/contrib directory.
After Composer finishes downloading, go to the module list page (/admin/modules) and activate all the ones mentioned earlier, or use Drush:
drush en commerce_recurring commerce_braintreeeCreating and configuring the Braintree gateway
The Drupal Commerce ecosystem offers more than 100 pre-built modules that support various payment services, such as Amazon Pay, iDEAL, PayU, Stripe, PayPal, or Braintree (see the documentation for the complete list). In this blog post, we'll focus on configuring the latter, going through the entire process step by step.
Obtaining Braintree API keys
In order to properly configure the payment gateway, you’ll need a Sandbox account, which you’ll set up at Braintree. You’ll also require a pair of keys for the application. You’ll obtain it from the developer section of the website. The registration process is straightforward and intuitive.
After creating an account, go to https://sandbox.braintreegateway.com/login and log in using the information you provided at registration. Click on the cogwheel icon in the upper right corner and go to the API subpage. In the API keys section, you can see an entry for your API key.

Source: sandbox.braintreegateway.com
Click the View link to see the details. Leave the tab open, as you’ll need it for further configuration.

Merchant account ID
The additional information you need is the Merchant Account ID. This is a different value than the Merchant ID. To set it, click the cogwheel icon and go to the Business tab.
Merchant Account ID is a unique alphanumeric string you can set yourself for easier identification. The important thing here is that when you create a new Merchant Account, you set the main currency in which you’ll accept payments.

Drupal Commerce-side configuration
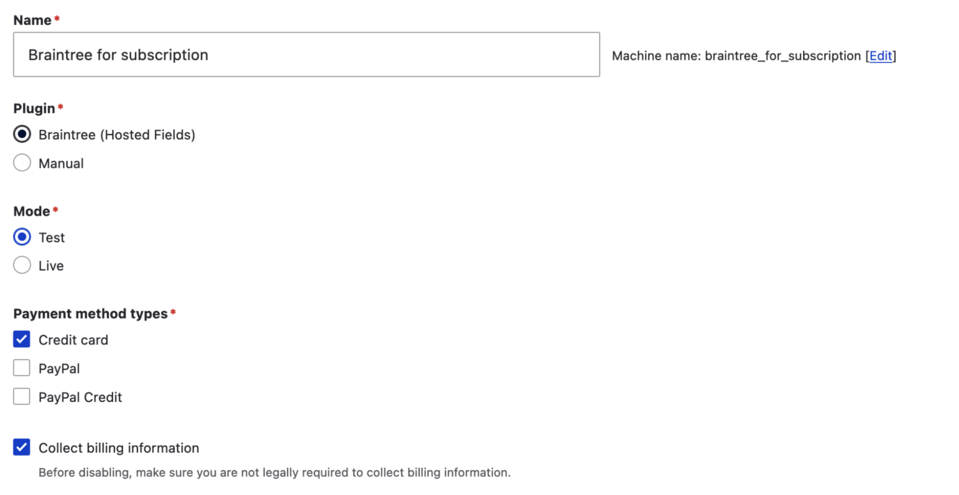
After installing the module, go to the /admin/commerce/config/payment-gateways subpage, where you’ll find a list of all payment gateways configured on your Drupal Commerce platform. Click the Add payment gateway button.
The Name field is the name that will identify your gateway on the admin panel side. From the Plugin list, select Braintree (Hosted Fields).
At this stage, in the Mode section, set the Test mode, and in the Payment method types field, select the payment methods you want to accept (currently, the module for Drupal only supports direct payment by credit card and PayPal).
Lower, there are additional options for configuring the plugin. Collect billing information when checked will make the form data stored in Drupal. According to the disclaimer under the box, make sure that you can legally opt out of this option and rely only on data stored in Braintree.
Then fill in the fields Public key, Merchant ID, Private key, and Merchant account ID with the data obtained from Braintree. You can also enforce 3D Secure, which enables strong authentication following the Payment Services Directive 2 (PSD2) on payment services.
The Enable Credit Card Icons option is strictly visual and determines whether payment card icons will be visible in the payment form:

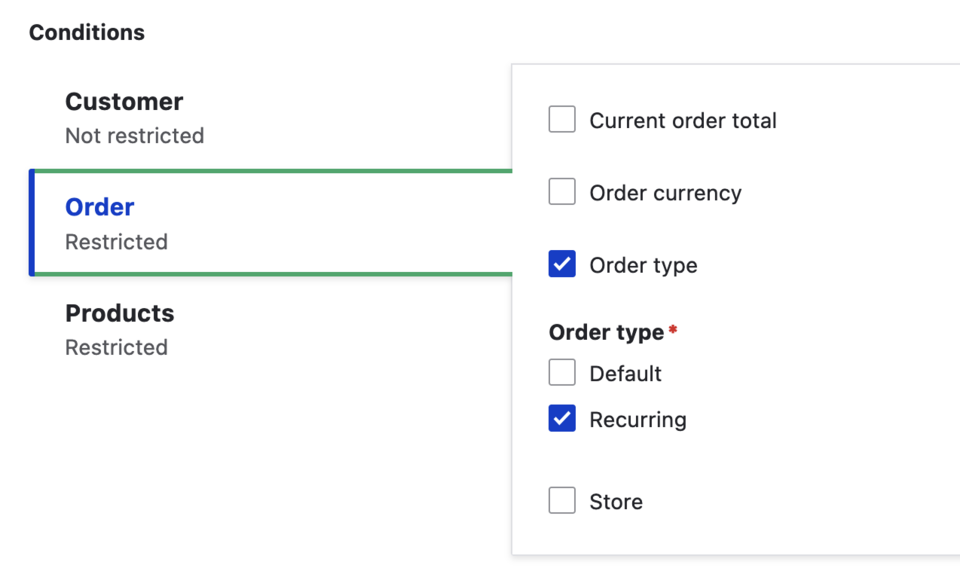
In the Conditions section, you can decide under which conditions the defined payment gateway will be available, such as when the customer is logged in or has products in the shopping cart for a certain amount. After configuring this section, click Save to move to the list of payment gateways.
You can also define a condition by which Braintree will be available only for subscription products, leaving other payment gateways for the rest of the products.
Payment testing
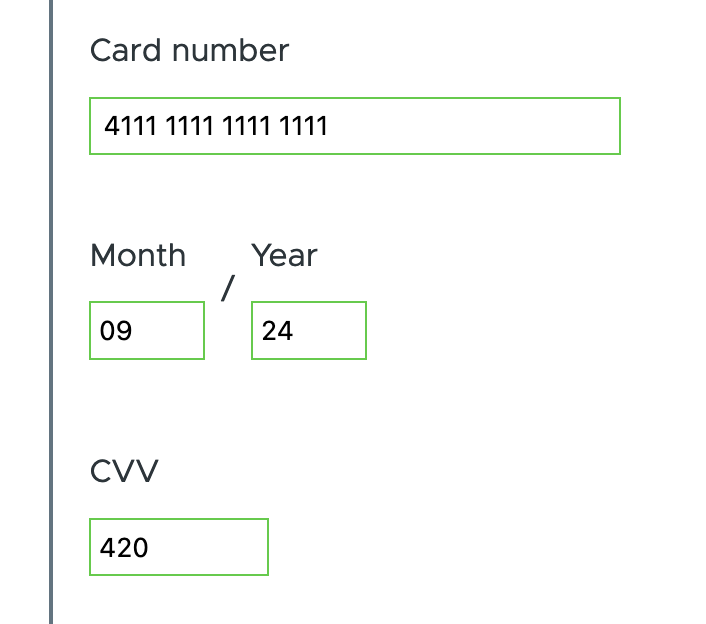
Now, you can add the product to your cart and go through the entire checkout flow, which is the process of completing your order. When you reach the payment step, select a payment card. The test details are: card number 4111 1111 1111 1111 1111, expiration date (later than the current month and year), and any CVV code according to the PayPal Braintree test instructions.
Once you’ve moved on and completed the checkout process, you’ve created a subscription. You can check its current status by going to [page_drupal]/admin/commerce/subscriptions on your website. There you’ll find the details:
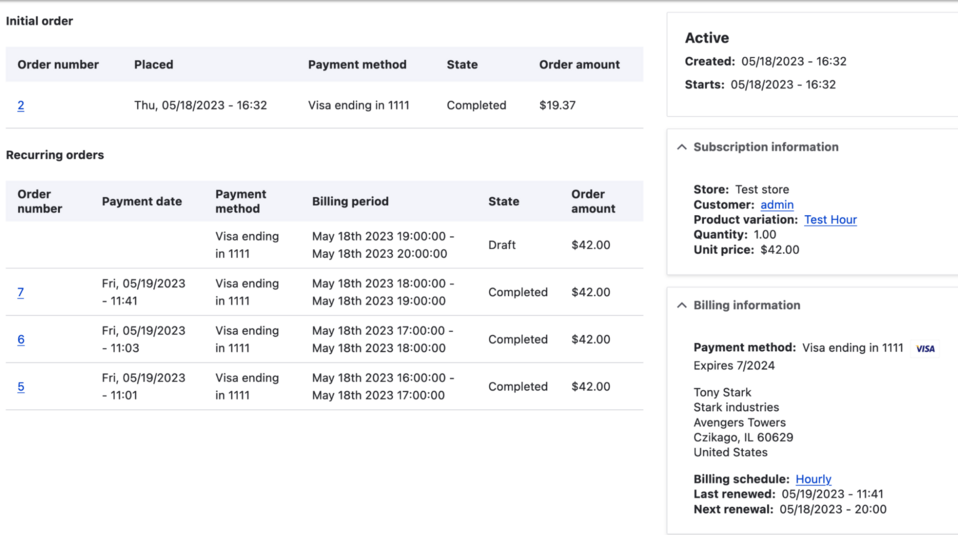
In this case, the purchased subscription has been configured to renew every hour. Payments are created to cover the following set periods. Similarly, you can look at the panel in Braintree, which is available in the Transactions tab.

PayPal payment integration
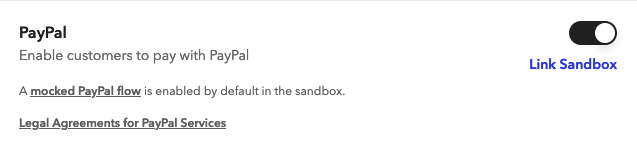
While payment by card is available immediately after installing the module ("out-of-the-box"), PayPal payment requires additional configuration on the Braintree side. So navigate via the cogwheel icon to the Processing tab. Here, you can choose which payment methods are accepted for your application. Under the PayPal switch, click Link Sandbox.
Obtaining PayPal API keys
In order to properly configure the payment gateway, you’ll need an account that you set up with PayPal and a pair of keys for the application, which you’ll obtain from the developer section of the website. The registration process is highly intuitive.
After creating an account, go to https://developer.paypal.com/. In the upper right corner, there is a Log in to Dashboard button that you need to press. Once logged in, go to Apps & Credentials. A web page will appear so you can manage your applications.

Source: developer.paypal.com
In the upper right corner of the web page is the Sandbox/live switch. To begin with, focus on setting up the gateway in Sandbox mode, so click Sandbox.
In the REST API apps section, click the Create app button. In the App name field, enter a name for your app so that you can identify it in the PayPal developer panel.
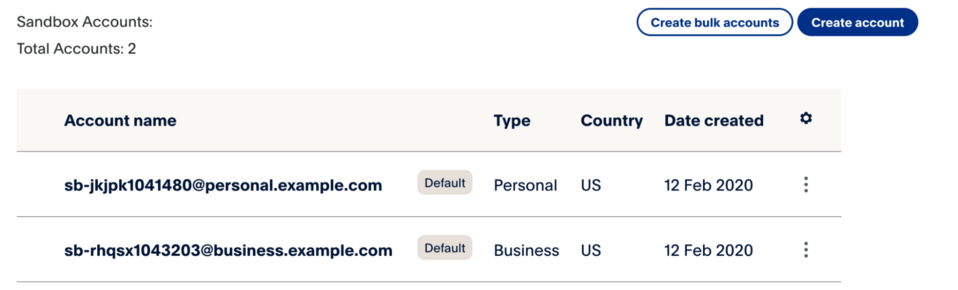
In the Sandbox business account field, you may notice that there are two email addresses to choose from: one in the personal domain and the other in the business domain. These are test accounts created by default on PayPal to test payments. If you would need additional accounts, you can make them by clicking Sandbox>Accounts in the left-hand menu and then – Create account. Select the account in the @business.example.com domain as the account that will "own" the application you’re creating.
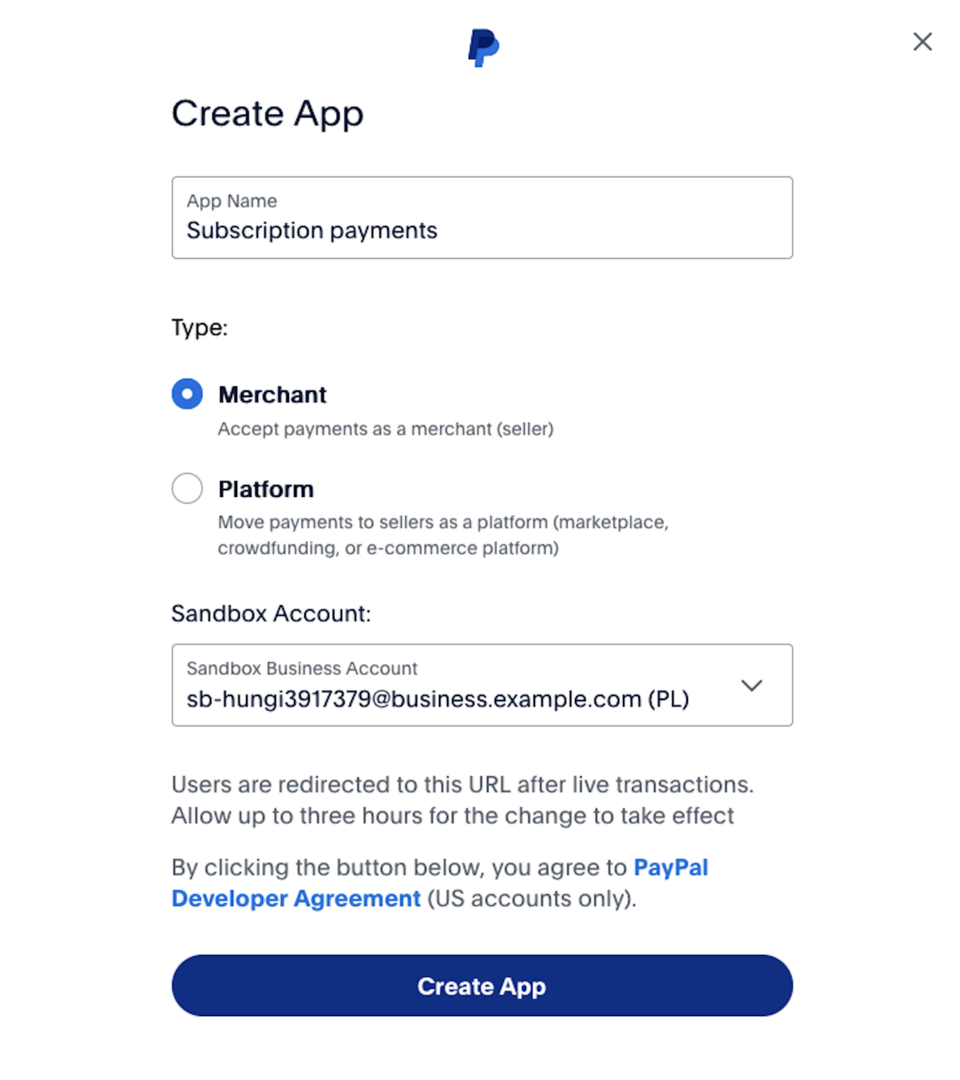
As you’ll see later in the blog post, in the live mode, this field is skipped, as the application keys are linked directly to the PayPal account by default. Once the process is complete, you’ll look at information about the created application.
In the Sandbox account field, you’ll see the sandbox email address set as "owner." At this point, you’re interested in the Client ID and Secret areas (you may have to press the Show button to reveal them). This key pair allows you to communicate with PayPal's API.
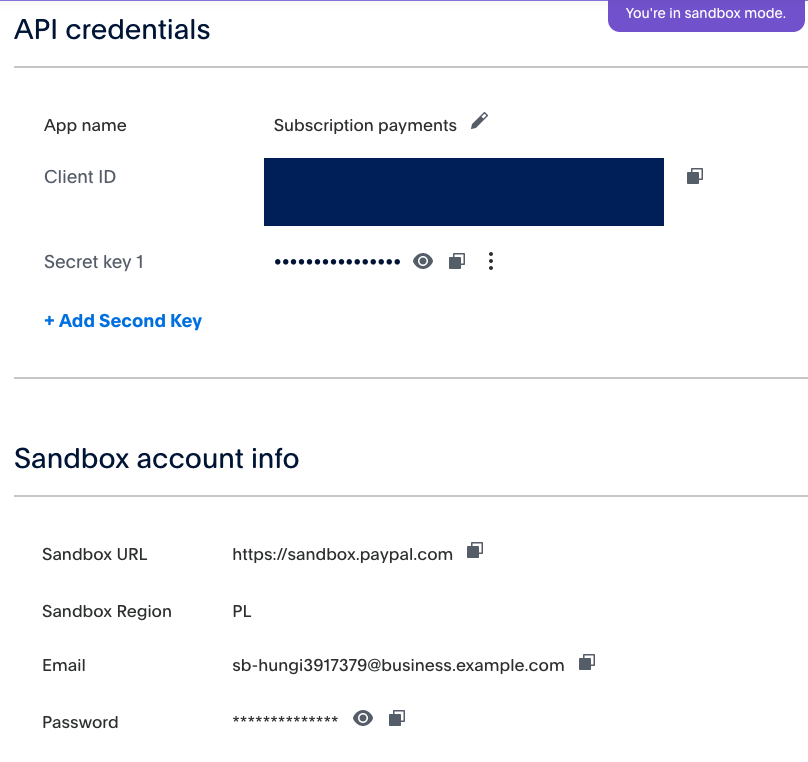
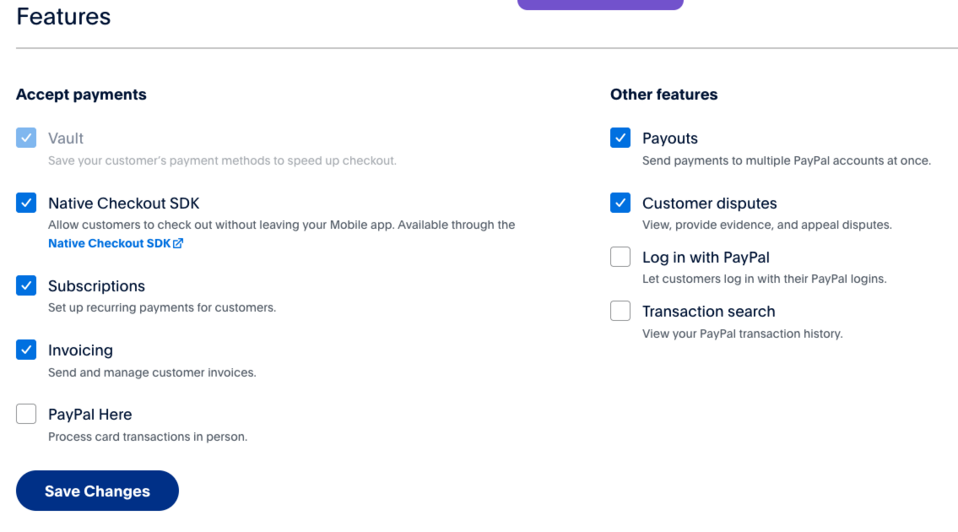
Below, you’ll find other configuration options, such as setting the address to which users should be redirected after a completed transaction. We recommend checking the Transaction Search box, which is unchecked by default and offers access to transaction history. After making changes, Save them.
Then, you need to complete the required data in the Braintree module configuration.
Checkout flow
Now, during the checkout process, you can select PayPal as a payment option (remember to enable it in the gateway settings). After selecting it, you’ll see a yellow PayPal button.
Being aware that the gateway is temporarily running in Sandbox test mode, you need Sandbox account details. To do this, go to the Sandbox>Accounts tab on the PayPal developer page. There, you’ll see a list of developer accounts assigned to your account.
Remembering that you’ve assigned an account in the business.example.com domain to your application, click View/edit account for the personal.example.com domain. From the window that appears, copy the Email ID and System generated password (you can change the password at any time by clicking Change password) and paste them into the corresponding fields in the login window that appeared during the purchase process.
Braintree PayPal - go live
After testing the operation, you can switch to Live mode. The process looks identical to the Sandbox application.
To do this, return to the dashboard on the PayPal developer website and Braintree. Click Live in the toggle at the top of the web page and then Create new app. Go through the identical process as before, ending with receiving the keys. Then, go back to the payment gateway settings, switch the checkbox to Live, and fill in the new data.
Congratulations! You’ve successfully set up the Braintree payment gateway and linked it to your PayPal account.
Recurring payments in Drupal Commerce - summary
From our experience with the implemented Drupal Commerce services, we know that setting up recurring payments isn’t complicated. And if you’ve been following the blog post on subscriptions mentioned at the beginning of this text, you already have everything set up. In case your subscriptions are product-based, you don't need to do anything else – just have your customers select the options provided by Braintree as their payment method, and the Commerce Recurring module will take care of the rest.